I know that I have not posted in ages. As in past years, summer tends to consume me and I am outside busting ass on the Ponderosa instead of sitting in front of my laptop writing. However, it is time to take a break from ass-busting to let you know of a little something The Pup is involved with. My Lovely Wife has entered Abby into a contest to appear in a calendar, and Abby is one of six finalists to appear on the cover!
Awesomeness
Here are a few words My Lovely Wife wrote to go with our entry.
This is our dog, Abby. She is a 11.5 year old Chesapeake Bay Retriever/German Shepherd cross. Her favorite thing is to retrieve sticks thrown into the river and you can see how happy this makes her! Abby is currently recovering from her second surgery in two weeks to remove a Mast Cell Carcinoma. We are hoping all the nasty cells have been removed and once her staples are removed next week, she can once again enjoy her summer with swims in the river. We love her dearly and cherish everyday with her. Thank you for voting for our sweet girl.
I took this picture a couple of years ago and think it does a great job of capturing Abby's spirit and energy. If you think so too, head on over to Facebook and like her picture. Your vote could help put Abby over the top!
The calendar is a fundraiser for The Konan Koalition. As it says on their website
The Konan Koalition has two goals:
Mitigate unnecessary pain and suffering in animals that cannot access veterinary treatment because of financial constraints facing their owners
Assist pet owners in making animal care decisions based upon the needs of the animal rather than financial limitations. Helping pet owners in this way will go a long way to reduce unnecessary euthanasia
Things have been pretty stressful out here on The Ponderosa over the last few days. My Lovely Wife noticed a nasty looking purple growth on the belly of our dear dog Abby on Thursday afternoon. She made a call in to the vet who had her in for a look the very next morning. He got her in for surgery the following Monday (today), saying that he would have operated that day on her if he possibly could have.
Now, a nasty looking purple growth is not something you want to see on your dog's belly. My Lovely Wife and I reasoned that it was probably just a hernia from where she had been spayed. That or some harmless fat lump. The vet didn't think so. It didn't feel like a hernia and it didn't feel like a fat lump. The purple color was cause for concern. The vet didn't actually know what it was, but he knew it had to come out. My Lovely Wife and I did not question this course of action for a second.
We spent the weekend thinking positive thoughts. Abby was acting her usual self and didn't seem overly sensitive in the area. We focused on all the things it could be that were not bad rather than the things it could be that were bad.
Abby went in to the vet at 8:00 am this morning. We got a call around 12:30 pm that she was just coming out of the anesthetic. My Lovely Wife picked her up from the vet around 3:00 pm. This picture was taken around 6:00 pm. Apparently, it is going to take more than a nectarine-sized growth removed from her belly this morning to keep a good dog like Abby down for long.
Not Every Dog Can Rock A Pink Pressure Bandage Like This
I came home from work today to see My Lovely Wife and Abby waiting outside for me. The sight of her standing there brought tears to my eyes. I had been dreading a call from the vet that the news was very bad and there was nothing they could do. To see Abby standing there almost as if nothing had happened was huge.
We are very relieved and very happy to have Abby back home, but we're not out of the woods yet. The vet said that he was able to remove all of the growth, but he is uncertain as to what the growth actually was. He has sent it off for analysis and hopefully we will hear some good news back soon. All we can do in the meantime is help Abby along with her recovery and keep thinking positive thoughts.
The vet did warn us to feed her sparingly because she wouldn't
be able to keep it down. But they don't know Abby. After nibbling on
some soft food and having a bit of chicken breast, she's just finished
chowing down on some of her usual kibble with no evidence of ill
effect. All this while the anesthetic and painkillers continue to
course through her veins. If I were to only look at the front half of
her, I wouldn't know that she was on the wrong end of a scalpel only
hours before. Her eyes are clear and her expression is normal. The
only giveaway is the head-bob now and then that suggests that she is
actually exhausted.
It is only fair that the growth turns out to be nothing. Abby deserves a break, because good things should happen to good dogs.
P.S. Click here for more on Abby's (mis)adventures in the years she's been with us. You're sure to get a chuckle or two out of it, and I'm sure you'll agree that "The Pup" is indeed awesome.
Engineering is not well understood by most mortals. As a matter of fact, I gave a presentation at work last week to give others in our company a better idea of what we Engineers do in our department and how we see our role in the grand scheme of things. This was Page 2.
Engineering, As Seen By Engineers
(Note that "Engineer", "Engineers", and the profession of "Engineering" should always be capitalized, just for reasons of general awesomeness.)
I must confess that this public misunderstanding comes as close to home as my own Dear Sister. When talking to her about something technical, I generally get asked: "Does it involve a system of pulleys?" A fine inside joke indeed. It also speaks to the fact that simple things can become deceptively complicated. Case in point, and something I've wanted to blog about for some time now, is my rainwater collection system.
Water is a precious resource out here on the Ponderosa. All we had when we moved in to the place was a well to supply our water, and not a very good well at that. It wasn't very deep and recharged slowly. It was enough for drinking, washing, etc. but didn't have a lot of margin for watering gardens and newly planted trees. I figured one thing I could do was build a rainwater collection system. As usual, no half-assedness would be tolerated.
I based the system around the idea of a dry stream bed. Building this was a big job. A very big job.
Had I Known How Big A Job This Would Be, I Likely Wouldn't Have Started.
The previous owner had tried something on a smaller scale but it sucked. It was just a rectangular-shaped pile of rocks down the slope to the back of our house. Half the rocks were missing and it was a weed infested mess. I cleared out all of the old stones and came up with a shape with a more natural flow to it. I then laid down some heavy duty landscape fabric to keep the weeds down. On top of that I laid down some 1" chicken wire to discourage any gophers that might want to dig a hole in the middle of it
It doesn't show well in these pictures, but there is a dry stream shape about a foot deep that winds its way through all of these rocks. This dry stream is lined with a thick EPDM rubber normally used to line garden ponds. The water I collect from my eaves-troughs drains into the top of the stream and winds its way down to the bottom. The stream bed is actually functional when it rains.
Laying all of the rocks was a huge job. There must be thousands of rocks here of various shapes and sizes. And many of these rocks are heavy, big-assed rocks. It took me a couple of years to get this part done. Every rock was put in place by hand, both to give the right mix of large and small, and also to make sure the entire surface was well covered so you couldn't see the landscape fabric or the liner below. The fact that it is on quite a slope added to the challenge. Want to get strong??? Move out into the country.
All the water I collect up top gets to the bottom. Right about here.
There Must Be More To It Than This???
This is where the "system of pulleys" come in. Let's take away the gravel in the center of the picture above.
A System Of Pulleys
Here is where things get interesting. Taking off the gravel shows a heavy grill meant to cover a fire pit. It sits on top of a hard plastic sump basin that I got at Home Depot for $20. It is just like the one shown in the left of the picture, only the one in the ground right now has a big crack in the bottom. It didn't always have that crack, but it seems that water expands when it freezes. The first one I used was left in place all winter to prevent the dirt around it from caving in. It got some water in it which subsequently froze and blew the bottom out. So the cracked one is used in winter to keep the shape of the dirt around the pit and the other one is used in summer to hold the water.
The above picture gives a closer look. You can see the heavy rubber liner used to carry the water down the stream peeled back. The sump pump I use to pump the collected water back up to my holding tank is shown in the bottom left. You can just barely see the check valve behind the float switch that prevents the water pumped up and out of the sump pit from flowing back down again. You can also see a couple hoses poking into the sump pit. The one at about 2 o'clock runs under the rubber liner and connects the sump pump to the holding tank above. The other one around 5 o'clock brings in water from another downspout at the other end of the house.
Springtime means pulling the old sump pit, putting the new one in its place, connecting everything up, and making it all pretty again. The dance goes a little something like this.
Step 1: Pull out the old sump basin. The chicken wire and weed fabric are clearly visible.
There Were Only Two Dead Mice In The Hole This Year
Step 2: Put the good sump basin in place and connect the hose up. I use some flat rocks to prevent the pump from moving around within the basin. Otherwise, the float switch could get hung up and prevent the pump from turning on when the pit gets full of water (ask me how I know). Tie-wraps are also used to keep the hose and the cords out of the way.
Step 3: Put the grill grate back over top of the sump basin, making sure the wires from the pump and float switch are brought out. Lay the heavy rubber liner back down so the water carried down the stream will drain into the middle. The picture below shows the setup back together, just needing the gravel to be put back on top of the grate.
Step 4: Plug the float switch plug into the AC power cord and the pump into that. I run the cord through Liquatite flexible conduit because a critter will gnaw through an exposed power cord if they get half a chance. They'll generally just do it once, though...
The top part of the design is a lot less complicated than the bottom. Here is a picture of the front of the house in early spring where the downspouts are not connected in to the system of pulleys. No point dumping a bunch of water in during spring thaw that could later freeze and bust things up.
Taking a closer look, you can see a black tube that comes up from below ground near our front step. This is just a section of non-perforated weeping tile that is teed below every downspout. The middle part of the tee connects to a flexible piece of downspout extender.
This picture gives a better look of the downspout extender connected in to the downspout above. Rainwater from the eaves-troughs flows into the downspout, into the downspout extender, and then into the weeping tile buried below. Silicone and hot glue keeps water in and leaks out.
The weeping tile carries the water from all the downspouts to the top of the "dry" stream bed. Gravity takes over and the water flows down into the sump basin. The sump pump cuts in when enough water has been collected and pumps it back up the slope via a hose hidden under the stream bed's rubber liner to a holding tank.
It's simple, really.
Now up top, I mentioned how water is a precious resource out here. But since I got this baby together, we've gotten our house connected up to "city water" and so we no longer depend on the well. I also since finished another mega-project to bring water up from the river 85' feet below to water our trees and garden (a topic for a future blog post, perhaps). Finally, it seems that every cloud that passes over the house lately brings with it an inch of rain.
Water is still precious, just maybe not quite so precious as it used to be.
Last time around, I wrote up how rain information is sent from the Davis Weather Station Integrated Sensor Suite (ISS) to the console sitting on my kitchen counter. That left me with one more piece of weather data to figure out: humidity. Evil humidity.
I had been puzzling over humidity for weeks before I decided to switch to rain. The data seemed to make sense for a while and then I would get a datapoint that made no sense at all. I was pretty certain that humidity was sent in message 0xa0 from the station, and I was also pretty certain that the data would be contained in just one byte. Sounded reasonable because humidity is displayed on the console to the nearest percent.
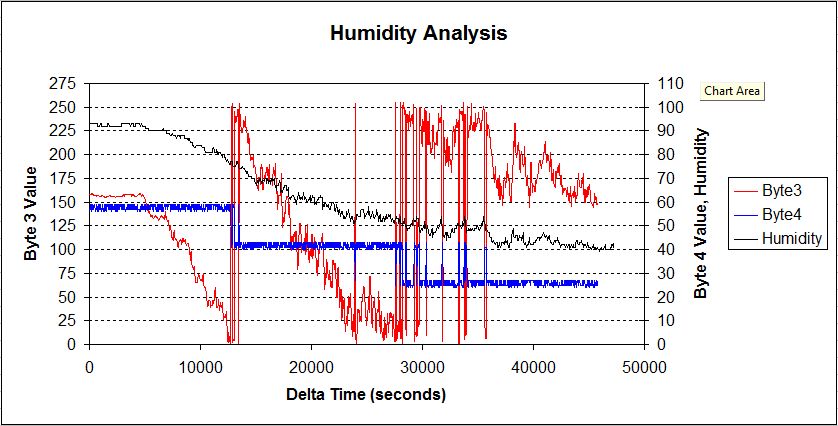
Humidity was stumping me until I got serious last weekend and wrote a Python script to collect STRMON data continuously while my DIY datalogger dutifully captured the console's interpretation of the data. Then I could make some plots and figure out what was going on. Like this:
Click To Embiggen
It was quickly apparent in looking at this data that two bytes were involved in encoding humidity. You can see as the humidity drops, Byte 3 cycles through a couple times
while there are some discrete steps in Byte 4. The weird thing was that
Byte 4 isn't flat as in a high byte, low byte kind of thing. There is
jitter on it that I didn't expect.
Puzzled, I thought some fresh eyes on the subject might help. So I posted this plot and a link to the data I collected on this wxforum post. It was user Kurgan for figured it out for me within eight hours of my post. He da man! As he wrote in his post:
If you take byte 4 and convert it to binary, you will see that the
values is has assumed in the test, which are 24,25,26,27 then
40,41,42,43 and then 56,57,58, 59 are made of two parts: the first four
bits are fixed (the big steps), and the last four are variable (the
jitter).
So:
24 25 26 and 27 have the first four bits set at 0001
40 41 42 and 43 have the first four bits set at 0010
56 57 58 and 59 have the first four bits set at 0011
So,
you have to add the first four bits of bit 4 to byte 3 to get a 12-bit
number. Try to plot this 12-bit number and compare it to the hum graph.
The last four bits of byte 4 are something else, or are random noise. I don't know.
I thought he had it wrong the first time I wrote up this post but forgot that the values in Byte 4 as written above had been converted to decimal. Convert them back to hex for his explanation to make sense. Next step: make a pretty plot.
Now That's Pretty
That is bang on. The calculated value
works out to the humidity displayed on the console * 10, so a calculation of 750 = 75% RH. The lines don't sync perfectly because the
timing is a bit off and the logger logs in intervals of 1 minute vs
irregular intervals on STRMON.
As I wrote in a post that followed, there are other
mysteries are buried in the data. For example, here is data from message 0x90 (144
decimal).
The columns are elapsed time in seconds, message number,
byte3, byte4, and byte 5. I deleted the wind and crc data. The numbers
in byte 5 jump up and down mostly in step sizes of 16 before resetting
and then starting over again at some different value. Looks like a counter of some kind. And why is byte 4 in this
same message just bouncing between 0 and 3? Byte 4 in the rain message
(0xe0, 224 decimal) does this too. I'm also told that the ISS sends a reading of its battery voltage to
the console That is also hidden away somewhere in all this data I've collected as well. And then of course there is data from the sensors I don't have: solar, leaf wetness, and soil moisture.
But I don't care too much. I'm getting all the weather related data my ISS can send me. Figuring out other stuff down the road would just be a bonus. Now it should be a relatively straightforward matter of writing some code for the Alternative Davis Weather Station Receiver and having its values exactly match the values displayed by the console. Cool.
Today's weather at Mad Scientist Labs: Cloudy and Cold. Wet and Miserable. Rain, rain, and more rain. In a word: perfect.
This Takes Me Back...
As a (hopefully) interesting aside, The Cult used to go by the name of the Death Cult, and before that the Southern Death Cult. I guess there is something to be said for brevity. There's also something to be said for picking a name palatable to all those moms who buy music for their kids. Music was on "records" or "LPs" back in those days. And I walked to school uphill both ways.
With weather this lousy, going outside and taking care of various chores out there just isn't going to happen. This gives me a perfect excuse to take it easy after a very busy week and do some stuff I enjoy doing. What might this be, you ask?
Well, moments ago I pulled a good looking loaf of Jim Lahey's "Pane all’Olive" out of the oven. This is a fancy way of saying No Knead Olive Bread. How'd it turn out?
Damn Good, That's How. And I Don't Like Olives.
I've been a big fan of his No Knead technique lately, since the taste to effort ratio is astronomically high. Here is a link for this bread and two others that you might want to try.
I've also spent some time today reverse-engineering the STRMON data spit out from my weather station. I had all of the weather-related parameters sorted out now with the exception of rain and humidity. It was raining this morning, so that gave me the chance to figure rain out. And figure it out I did.
Yay Me
In fact, I wrote up a bit of Python code to help me figure this out. It grabs the STRMON data, timestamps it as the number of seconds since the script started, converts everything to decimal so the math is easier, and then writes the data as a CSV file. I don't show the checksum bytes in the last two bytes of every message because that would just pointlessly make the file bigger.
The rain was coming down pretty good and I watched this stuff scroll across the screen. When the console added another hundredth of rain, I wanted to see the message that caused it to happen. Let's cut the irrelevant crap out of the above.
Message 244 is 0xe0. I had suspected before that this message held rain, but I expected to see it in the second last field above. What I thought would happen was the console would send a "1" any time the rain bucket tipped. But then I saw this field bounce around between 1 and 3 randomly. It turns out I was off by one byte. Rain is actually in the byte before (40... 41). What the ISS does is send a running total of rain between 0 and 255. In the example above, it would continue to send 41 until the rain bucket tipped again. Then byte 3 (counting from 0) in message 244 (0xe0) would change to 42.
This is smarter than what I was thinking. My method could have had the console miss a count of rain every now and then if there were interference. But by sending a running total, this can't really happen. It is up to the console to track the changes in this byte.
I haven't figured out what those values bouncing around between 1 and 3
are. I'm suspecting they are just noise from a sensor that I don't have
and isn't connected. Or something like that. I plotted this field
against the rain plot above and there was zero correlation. In other
words, I don't care.
One thing I discovered along the way and that I do care about. In the example above where the STRMON 0xe0 message changes from 40 to 41, the change doesn't show up immediately on the display. In fact, it didn't show up until the next 0xe0 message came along ten seconds later. Interesting, and good to know as I continue my hunt for humidity.
Faithful readers of this blog (that joke never gets old) will have noticed that I haven't blogged for a while. Well, I've been busy. Very busy. Unspeakably busy. I am tired. I am weary. I am grumpy. However, I am also strong. I am beat, but not beaten. I am bent, but not broken. I am shaken, but not stirred.
Best Bond Ever
The good thing about a gruelling workload and complete exhaustion is that it makes you want to tell other people how miserable you feel. What better time then to unleash some hate on a piece of crap that nobody should ever buy?
KitchenAid Can Opener Crap
Yes, I'm talking about a can opener. A KitchenAid can opener. A Kitchenaid can opener that is a piece of crap. I'm an engineer and I don't think it would really be that hard to make a good can opener. And you know why? Because I know how diamonds work. A diamond is (almost) the hardest substance known to man. And everybody knows that a diamond can put a scratch in just about anything because it is harder than just about anything. So things don't scratch diamonds. Diamonds scratch things.
It is that simple. If you want to cut something like, oh I don't know, a can... you need to make something like, oh I don't know, a can opener... that is made out of stuff that is harder than the can. This isn't rocket science. But this seems to be beyond the comprehension of the incompetent designers at KitchenAid. My lovely wife bought this can opener a couple years ago for $15 bucks. Big handles, beefy looking construction... what is not to like? What is not to like is the "unable to open cans" part. Look at this.
Looks OK?
So what is the problem, you ask? Take a little closer look.
Look Again. Craptastic!
See how the gear that is supposed to grip the can is a mashed up mess? That is the top minds at KitchenAid not understanding how diamonds work. Because whatever this gear is made out of, it isn't harder than the tin can it is cutting through. Instead of the can taking the damage, the gear does. I sent this KitchenAid Crap Can Opener off to where I'm sure a few million other KitchenAid Crap Can Openers can be found.
One Man's Garbage Is Also Another Man's Garbage
You know, it occurs to me now that maybe the folks in KitchenAid's Can Opener division aren't really incompetent. Maybe they think this is a brilliant planned obsolescence idea. Maybe they think that people will just roll over and spend $15 bucks on a brand new KitchenAid Crap Can Opener every couple years. Maybe. But in this day and age of the Internet and the ability of people to spread the news of what they've learned, that shouldn't happen. So screw you, KitchenAid Crap Can Opener Division.
We can't be can-openerless in this day and age. After some research (and I research everything now), My Lovely Wife and I decided on this bad boy.
Meet The New Boss...
Meet the Nogent Super Kim Can Opener from the fine folks at Lee Valley. The blade is made of tempered carbon steel, and it works (so far) like a damn. It is great in that it doesn't leave that sharp little sliver just as you finish cutting the can through like every other can opener seems to do. It has a very smooth mechanism, does not leave a sharp edge, and takes up very little space in the drawer. However, rest assured. If this thing craps out in a couple years, you'll hear about it.
This wraps up the first Public Service Announcement from Mad Scientist Labs. There will be more.
I try to make it a habit not to talk about my job on this blog, but let's just say that the last three weeks have been pretty challenging. Something came up late this week that made it look like a bomb would go off and blow my weekend all to hell. I was certain this was going to happen and had resigned myself to busting ass this Easter long weekend instead of taking it easy.
But the bomb didn't go off.
Now, not only do I get to enjoy a long weekend, but I've also tacked on an extra day to give myself four days off. That is three days longer than last weekend and four days longer than the weekend before. To make things even better, the weather outside has been crappy. That gave me the excuse I needed to do whatever the hell I felt like this weekend. Manna from heaven, baby.
Manna Can Be What You Want It To Be
All this is good because I had a few things on my list that I wanted to get through. The first item on the agenda was to eat a whole hell of a lot of cheesecake. I've been trying to lose a few pounds over the last couple of months, and I've kept the idea of eating a cheesecake in mind the whole time as a reward. My Lovely Wife doubled the recipe, so my cheesecake is the right half.
Before - My Half Is On The Right
After - Mission Accomplished
Now I'm no Cheesecake Master, but I did what I set out to do and packed this bad boy away in an evening. And I was some full. The detailed stats on this gluttony:
What I'm quite amazed by is that I stepped on the scale the next morning and my weight was exactly what it was the day before, despite all this food and despite pounding back a ton of water. Yay me. My Lovely Wife got the half on the left and did a bang up job of it too. Let's just say that there isn't any of this taking up space in the fridge one day later.
The second item I had on my list for the weekend was making progress on using my Pretty Pink Pager as an alternative Davis Weather Station Console. This was Goal #4 from the list of items I hoped to accomplish this year. You might recall from my last blog post that I had made some progress in decoding the data stream coming in from the Davis outdoor wireless Integrated Sensor Suite, and before that I had been able to sense the power coming from the ISS. But it was still a pretty big step to go from what I had to getting real data. And faithful readers of my blog (ha ha ha) might have noticed that I haven't posted for almost a month. "Perhaps he fell into a cheesecake induced diabetic coma and died?", you may have wondered.
Well, wonder no more. You see, the wheels of progress here at Mad Scientist Labs might grind slowly, but they grind fine. I have been chipping away at this stuff for a long time and finally have something worth showing. Take a look!
Click To Embiggen
This photo shows my IM-ME perched on top of my laptop. The STRMON output from my console is chugging away in a terminal in the background. Note how the eight data bytes on the IM-ME display match the eight data bytes on the screen directly above.
Now I think that is pretty cool.
I first proposed that this might be possible back in January of last year, saying "It's so crazy, it just might work". And you know what? It works very well indeed. Let's take a closer look.
This Took Forever To Get Right
Now here is what you are looking at:
Freq is pretty obvious. Chan is the corresponding channel number from 0 - 50.
Data is the eight data bytes received from the ISS. And guess what? They come in Least Significant Bit first, and I have to reverse the bit order in my software.
CRC indicates if the check is OK or not.
LQI is the Link Quality Indicator. The radio is kind enough to automatically collect this information for you and stick it onto the end of the packet if you ask it nicely. It is an estimate of how easily the radio demodulated the last 64 symbols immediately following the sync word. I don't have a good feel yet if "50" shown here is good or not. About all I know is this is a 7-bit number, so I'm kind of in the middle of the range here. It might get better if I clean up the offset (below).
RSSI is the Received Signal Strength Indicator. Again, the radio sticks this onto the end of the packet for you. The NOW value shows the current value and updates in a blur. You can see that when the carrier came along, it was at a booming level well above that of the background noise.
OFFSET is an indication of how far you are off from the true center frequency of the signal. It is actually the value in the FREQEST register that I grab after receiving the packet and setting the radio to idle. This value is two's complement with a resolution of (Fref / 2^14), and that translates to around -13 kHz for the offset I have now. I need to tune this in a bit, and I suspect that will improve the LQI number above.
I hit some funny problems as I went along. Here are a few of the things I tripped over, keeping in mind that I don't do embedded firmware development for a living. Or at all, for that matter.
I could not get interrupts to fire for the life of me. I was triggering what should have been one from my code and... nothing. Only accidentally did I trip over the CC1110's Global Interrupt Enable bit that is disabled by default. I enabled that and interrupts starting working fine.
Davis got the bit order of the two sync bytes backwards
from the manufacturer recommended 0xd3 0x91. I had to tell the CC1110 to sync on
0xcb 0x89.
My RSSI reading was locking up at unpredictable times. Turns out this is actually intended behavior. I had my sync word detection set up to be very lax and the IM-ME was syncing on random noise. As it says in the datasheet...
"In RX mode, the RSSI value can be read continuously from the RSSI status register until the demodulator detects a sync word (when sync word detection is enabled). At that point the RSSI readout value is frozen until the next time the chip enters the RX state."
I'm really happy to have gotten this far. There was a lot of stuff I had to dig in to and reverse engineer to get to this point. There is still lots to do, but I believe the remaining bits are relatively straightforward by comparison. On my list:
Get this thing frequency hopping. I just dwell on Channel 0 right now, but I know the sequence of hopping frequencies, and I have oodles of time to get from one channel to the next. I don't know yet how the radio calculates what frequency to go to next, but I do have the raw frequencies, and that will do in a pinch.
Actually check the CRC. It always says OK right now.
Decode what all these data values mean and show them on a non-debug display. I've gotten some help here and have also figured out a few things in a look at this a while back, so I think I can get a few of the basic things displayed quite easily.
Gracefully adapt between the 27 MHz oscillator in my IM-ME and the 26 MHz oscillator many other people have. Some of the register settings are tied to the oscillator frequency.
Clean up the code. It is a dog's breakfast right now.
I have just uploaded my code to github with a little "git push origin packetrx". You can find the code here. It compiles with sdcc via the magic incantation "make -f Makefile.pocketwx" on the packetrx branch. If you happen to have an IM-ME and a GoodFET, you can then run "make -f Makefile.pocketwx install". Like I said, the code is pretty ugly and disorganized right now, but you might find it useful if you are looking at doing a bit of fixed length packet reception stuff on an IM-ME or any other CC1110 based device. There isn't much stuff out there on this right now that I could find.
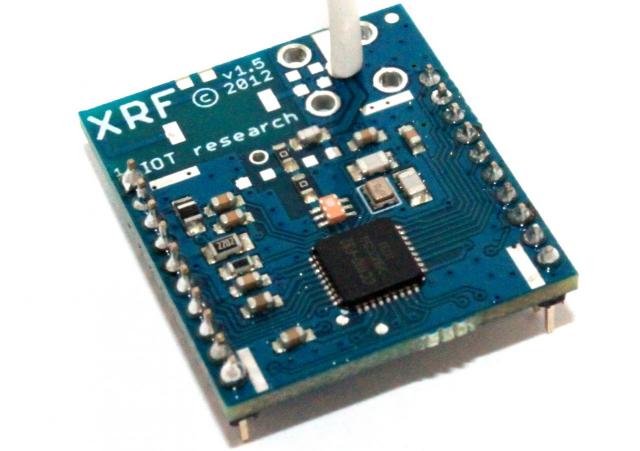
Now I know what you are wondering. The number of people with an IM-ME, the means to program it, and a Davis wireless weather station to listen in on are Quantity 1: me. But let's think about this a little more. Fine outfits like Archer Trading Post will sell you standalone ISS outdoor units that we now know we can build a compatible receiver around. But you can't walk into a store to buy an IM-ME anymore and it isn't expandable. That is where Ciseco comes in. They will sell you a CC1110 based XRF module in an XBee form factor for the low low price of £9.90 and dirt cheap shipping. And yes, I already have one. In fact, I might be the only person to ever order just one, as they are meant to be used in pairs.
XRF Module: TI's Development Kit is 41.3x More Expensive at $649
This all opens the door to building a pretty capable DIY, open source weather station console based on high quality commercial components to gather up the data. Davis sells really good outdoor hardware for this, but their indoor stuff is limited, low powered, expensive, and doesn't feature the kind of connectivity to hook into something like Pachube very easily. A little module like this brings a lot of capability to the table. This is my long term goal and won't happen anytime soon, especially with summer coming up and having to shift my time to various landscaping projects. But I do have a lot of fun playing around with it, and maybe things will move along faster if some other hardcore Davis weather fanatics decide to jump on board.
Before heading out, I would be remiss if I didn't thank a couple folks for helping me get this far. It was Travis Goodspeed who first mentioned that the CC1110 in the IM-ME should be compatible with the CC1021 in the console. Travis also designed the GoodFET, a board he literally gives away to further people digging in to stuff like this. It is a must have for IM-ME hacking. Then there is Joby Taffey, who wrote the PinkOS operation system for the IM-ME. I wouldn't have stood a chance without this code to get me rolling. And of course there is Michael Ossman who wrote the IM-ME based spectrum analyzer based on Dave's pioneering work. I'd have been screwed without all the previous work from these guys because, as this picture shows, I'm not much of a programmer.