Monday, January 20, 2014

For Our Dogster Friends

Update February 11th: Monster Speedup and Experimental Photobucket Rules

One thing that has become quickly apparent is that HTTrack can be ridiculously slow especially on bigger pages.   I have found a way to speed it up.  Way up. It appears that it throttles the download speed without telling you. There is a spot in the user interface that lets you set the maximum speed, but that does nothing unless you know a trick

Here is a shortcut to getting the speedup. Try putting the following in your Scan Rules
--disable-security-limits
--max-rate 1500000
--assume php=text/html
The first one is the secret to taking the brakes off. The second one is the maximum rate in bits per second. We have a two megabit download rate at our house, so I've set the maximum to three quarters of that, or 1.5 megabits per second. If you set this number too big, it just means it will hog your entire network connection. A rough rule of thumb might be that if you are getting internet through your phone company, try 1500000 as we have. If to the cable company, they are usually faster so try 5000000 (five million).

The "assume" bit is recommended in the HTTrack manual to speed up how it parses the files if you can make certain assumptions, and this assumption seems to work great.  Now it is only taking minutes to download smaller pages. The difference is night and day.  These scan rules are now in the main body of the blog post.

Not in the main body of the blog post is some new filters I have been using that seems to work well for downloading from Photobucket.
+*.photobucket.com/*.jpg
+*.photobucket.com/*.gif
+*.photobucket.com/*.png
-blog.photobucket.com/*
-secure.photobucket.com/*
-support.photobucket.com/*
-tutorials.photobucket.com/*
The lower in the list, the higher the priority, so the order above of these filters is important. The rules start by saying you can only load .jpg, .gif, and .png files from Photobucket. That stops it from downloading all the html pages that then takes you down the rabbit hole and downloading the entire site. After that, it specifically blacklists (with the minus signs in front) the blog, secure, support, and tutorial sections of the site. This is just to be on the safe side.  This has worked well for all the sites we have tried, but keep an eye on it if you decide to try it.  I have not put this in the main body of the blog post but give it a shot.

Finally, another problem we've been having is that some pictures weren't showing up after a successful download. I suspect this is because of occasional heavy traffic clobbering the site. Try the following if you are having trouble:
  • From the same window the Scan Rules are entered in, select the "Flow Control" tab
  • In that tab, enter 5 into the Retries field. 
  • Everything else is as per usual. 
Good luck!

Update February 9th: Disable Photobucket Scan Rules

It sounds like some people are running issues where HTTrack wants to download half of Photobucket.  It looks like you will need to figure out more specific scan rules than the ones I have in there now.  I have removed references to Photobucket from the post.

Update February 8th: Fixes and the Addition of Catster!

I have updated the scan rules to fix a few things and have created a set of scan rules for Catster as well.  The new rules are in the main body of the post.  A shout-out to the Dogster (and Catster!) folks that have helped out so much.
  • The gift archive now works.  A new scan filter "+www.dogster.com/subscr/gift_archive.php?pet_id=590841" (or whatever your pet's number is) does the trick.
  • Thumbnails in photo comments now work.  Dogster, for some bizarre reason, has those thumbnails in a URL that looks like "+files.dogster.com./blahblahblah".  Did you catch the weird period between "com" and "/" in that last sentence?  Neither did I at first.  Tweaking the Scan Rule from "+files.dogster.com/*" to "+files.dogster.com*" did the trick.
  • Added a scan rule"+badge.dogster.com/*" to fix missing badges.
  • Added a few new scan rules that should help images from flickr, photobucket, and one other site I'd never heard of come through: "+*mytextgraphics.com" "+*.photobucket.com/*",  "+farm*.staticflickr.com/*", and "+farm*.static.flickr.com/*".  You can skip these if you don't have images off the main site, but leaving them in doesn't hurt anything.
  • Added a set of scan rules for Catster.  Did you know that the images on Catster are stored on servers named Dogster?  Neither did I at first.  For this reason, the Catster list will have a "+files.dogster.com*" entry in it on purpose.  It will also have a "+files.catster.com*" on it that I doubt is needed, but better safe than sorry.
  • Added a scan rule that pulls in a specific file used to format the display of the photo pages "+www.dogster.com/photos/photo.css", though I didn't really see a difference when it was added.
  • Reordered the list of scan rules to be a little more sane
Attempts by the Dogster folks and myself to display images in the Pup Pals pages have failed miserably.  I suspect that it has something to do with that being a page generated on the fly with PHP and this is a known issue with HTTrack, but the gift history is also PHP and it works.  Weird.

It doesn't hurt to test the archive out by disconnecting your Internet connection, clearing your browsers cache (Google is your friend here), and then bringing up the web page created by HTTrack for your pet to see if anything is unexpectedly missing.  Note that the page might be slow to load this way because it is trying to reach out to some sites like Facebook, Google, and Twitter that I have intentionally not mirrored.  Your browser will wait for a bit, give up, and then load the archive anyway.  These links don't affect the display of your stuff and they'll be there long after Dogster Doomsday.  Once you connect the Internet back up, it will reach these sites normally anyway

If you are an old hand at this archive process, the only substantial changes to this post are in the "Specify The Options" part.  The rest is the same, so you can save yourself some reading.
Finally, some of you might be wondering why this archive takes so damn long sometimes.  I was mystified by this for a while too until I ran a test on a cat that had 36 pages (!) of diary entries.  I checked out the folder where the diaries are stored and there were a ton more entries than that.

WHY?

Well, there might be 36 pages of diary entries, but there are also five or six diary entries per page.  If you click on a "Comments" link, a whole new page opens up for just that diary entry.  Same thing for photos.  So if you have ten pages of diary entries and ten pages of photos, you don't end up downloading twenty pages.  You download twenty pages where entries are grouped together PLUS over a hundred pages dedicated to each individual diary entry and photo.  Yeah, that is a lot, but that is the only way to see the comments.  It also doesn't help that the download speeds from Dogster and Catster seems to be less than speedy in the first place.

"Beepers" on the Dogster forum posted a suggestion on how to speed up an update if you already have an existing download.
  • On the first option page, you can choose "Existing project name".  Click the arrow to choose the one you want to update.
  • On the next page/screen, in the "Action" block, click the arrow again and choose *Update existing download.
  • Then click on "Set options" and the "Scan Rules" tab as usual.  All your rules for the previous save will be there.  Just add the new rules at the bottom and proceed as usual.
Give it a shot!
          

Update February 5th:

The Bad News

Folks on the Dogster forums groups discovered that the archives would not work when they had no Internet connection.  That implied that the download would stop working once Dogster shut down.  I verified that this is a problem and am very sorry to say that all the downloads that everyone has done to this point will be useless once Dogster shuts down. The web browser was doing some stuff behind the scenes that I wasn't aware of.

The Good News

I have a fix that I would like people to try. I have tested this on a couple of pages now with my browser cache cleared and our internet disconnected and it seems to work perfectly. It still has the same limitations as before (can't click on gifts to get details, etc) but all the important stuff will be there. You will still be able to navigate around the page just like you did before.

The Fix

A new set of Scan Rules is now in the main body of the post.  The rest of the steps should be the same.  Try these new scan rules out and post feedback in the comments.  If you are computer savvy, you can double check by clearing your browser cache, disconnecting your Internet connection, and loading the archived page.  If everything looks good, you are ready for Doomsday when Dogster shuts down.

Please test this out and give feedback in the comments.  Once again, I'm sorry for my error. If I knew what I was doing here, it would help!

P.S.

Some people have been worried about seeing stuff like this in their browser address bar.

file:///C:/My%20Web%20Sites/cocopuffondogster/www.dogster.com/dogs/500107.html

The worry is that www.dogster.com is showing up there still.  That isn't actually a problem as long as the start of the address starts with "file:///C:/blahblahblah".  In this case the "www.dogster.com" part in the middle is actually now a directory on your hard drive.  You can use Windows Explorer or whatever to actually navigate to that directory and below.  There is all kinds of neat stuff tucked away in there!


Update Jan 25th:

See near the bottom of the page for instructions on how to save your videos!  A couple limitations of this technique are also discussed.  And after all of this, look who was made Dog of The Day for January 25th, 2014!!!


One of the saddest times of my life was when our dear dog Abby passed. She was my best friend and a big part of our lives. That was about a year and a half ago now and it still brings a lump to my throat just thinking about that awful time.

In the days that followed, I was struck by the sympathy and compassion expressed by My Lovely Wife’s friends in the Dogster community. Dogster is a website that dog lovers from all over the world congregate to share photos, stories, and advice on their best friends. While I don't doubt that some of these folks might be a few Milk Bones short of a full bag, My Lovely Wife has developed a true friendship with many people on that site, none of whom she has ever met in person. Our dog now gets more Christmas cards than we do.

Unfortunately, word went out a short time ago that Dogster will be closing down. All of the pet pages with the photos, diaries, and associated comments will disappear. People are understandably upset because they don't know how to save all of those memories. Some are printing the pages off, some are resorting to screenshots.  And some are just at a loss.

But I think I know a better way. And I'll show you how to do it yourself. Step by step.  When you are done, you'll have all of your stuff for your dog.  It won't copy forum discussions and stuff like that.  But it will copy all of your diary entries, all of your photos, and all of the comments on that stuff.  And it will store all that away on your local hard drive.

Ready to go?  Good.  Start with...

Read This Whole Thing Through

Like a recipe, I highly recommend reading this through once or twice to get some idea of what you'll be doing.  It does assume you know your way around your computer a little bit, but you don't need to be a guru or anything like that.  If you are comfortable installing a program on your computer and navigating around the various files on your PC, you should be just fine.

Download HTTRack

HTTrack bills itself as a website copier.  Click on this link, download the appropriate file for your PC, and install it on your computer.  There are a bunch of different versions for the various flavors Windows and whether you are running the 32-bit or 64-bit version, so choose wisely.  You'll be out of luck if you are on a Mac (sorry) unless you know how to compile your own programs.  There looks to be versions for various Linux distributions though for the 0.001% of Dogster users on that operating system.

During the installation process, the program will ask you if you want to put an icon on the Desktop and in the Start Menu.  Let it do so.

Start WinHTTrack

Click the icon the installer put on your Desktop.  The program should start up, displaying one of the ugliest user interfaces in existence.  That's OK.  We aren't using it for its looks.  When you get the screen below, hit the "Next >" button to continue.


Start a New Project

We start out by defining a new project as follows:
  • New project name: This is what the program will name the directory where it stores the files you will download.  I'll be using Abby's Dogster page as an example, so I called my project "AbbyOnDogster".  Use whatever name you like here.
  • Project category: Just leave this blank
  • Base path: If you were going to download multiple Dogster pages, then all of them would go into this directory.  You can use the default "C:\My Web Sites" (it works fine) or specify any other folder you like.
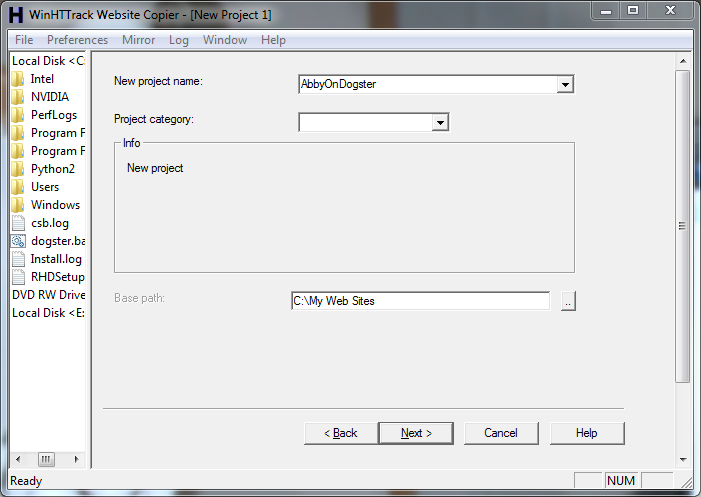
Once you're entered that information, hit the "Next >" button to continue.

Specify the Site To Mirror

So far so good, but now it starts getting a little trickier.  Fill out the next window as follows.
  • Action: Stick with the default of "Download web site(s)"
  • Web Addresses: (URL): The best way to fill this in is to navigate to the Dogster page you want to clone, select the address area, copy it (Control-C), and paste it (Control-V).  Or just type it in from scratch.  The window below shows the address for Abby's page.  It will look something like http://www.dogster.com/dogs/590841.  Click that link to see what I mean.
  • The tricky part is coming up.  Do not hit the "Next >" button yet.  Instead, select the "Set options..." button above it.

Specify the Options

(This Section updated February 5th and then on February 8th to fix the Scan Rules as mentioned at the top of this post).

When you hit the "Set options...." button, there will be a bunch of tabs on top.  Click on the tab that says "Scan Rules".  Don't worry about any of the other tabs.  See the area I have circled in blue?  Click your mouse in that area and delete every single character in there.  You want it to be perfectly empty.  Do not hit the "Exclude link(s)..." button.  Do not hit the "Include link(s)..." button.


Now, copy the four thirteen all of the lines of text below and paste it into the now empty area that has the blue circle above.  Cut and paste is your friend here.
-*
+www.dogster.com/dogs/590841
+www.dogster.com/dogs/590841/*
+www.dogster.com/subscr/gift_archive.php?pet_id=590841
+www.dogster.com/static/*
+www.dogster.com/files*
+www.dogster.com/images/*
+badge.dogster.com/*
+files.dogster.com*
+www.dogster.com/photos/photo.css
+*.cdnsters.com/*
+tetra.saymedia.com/*
+*amazonaws.com/*
+use.typekit.com/*
+*mytextgraphics.com*
+farm*.staticflickr.com/*
+farm*.static.flickr.com/*
--disable-security-limits
--max-rate 1500000
--assume php=text/html
Note that there is now a * after "+files.dogster.com".  This is a change from my first and second cracks at this.  Don't miss that one.

What if you have a cat?  Other than having to vacuum hairballs off the carpet on a regular basis, you want to use this set of scan rules instead.  Abby was not a cat, but work with me here.  Again, cut and paste is your friend.
-*
+www.catster.com/cats/590841
+www.catster.com/cats/590841/*
+www.catster.com/subscr/gift_archive.php?pet_id=590841
+www.catster.com/static/*
+www.catster.com/files*
+www.dogster.com/files*
+www.catster.com/images/*
+badge.catster.com/*
+files.catster.com*
+files.dogster.com*
+www.catster.com/photos/photo.css
+*.cdnsters.com/*
+tetra.saymedia.com/*
+*amazonaws.com/*
+use.typekit.com/*
+*mytextgraphics.com*
+farm*.staticflickr.com/*
+farm*.static.flickr.com/*
--disable-security-limits
--max-rate 1500000
--assume php=text/html
As explained up top, there are lines for both "+files.catster.com*" and "+files.dogster.com*" because Catster's images are actually stored on Dogster's servers.

This might look like Greek to you, but every single character here is important.  Make sure that these four thirteen lines get copied EXACTLY into the area circled in blue above.  That first line is indeed a minus sign followed by an asterisk.  All the other lines start with a plus.  All of this is important.

Or almost all of it.  The "+*mytextgraphics.com/*" won't be necessary for most people and could be safely left out.  One of our friends had a link to this website for an animated image of her pets name so this had to be included to get that to show up.  Others had images from Flickr (+farm*.staticflickr.com/*) and Photobucket (+*.photobucket.com/*).  Again, you can leave these out if your page doesn't link to these sites, but leaving them in there doesn't hurt anything either.  You would have to do something similar for any other off-Dogster sites that you link to for special images like that.  Just be sure to start the name with a plus and follow the format I've used.

You should end up with something that looks exactly like this when you are done.  Unfortunately the Scan Rules list is kind of long now so stuff is getting cut off on the bottom of the list.  But you get my drift.

Now if we were to proceed on from this point, it would copy Abby's page on Dogster because her Dogster ID number is 590841.  What you need to do now is replace the number 590841 with your own dog's ID number in all three places: the second, third, and fourth lines of the list.  Your dog's ID number is the one that shows up in the address bar of your web browser whenever you go to your dog's pet page.  It is usually six or seven digits long.  Do not add or subtract asterisks, slashes, or plus signs, or anything else unless you really know what you are doing.  Just change the number.  Get this wrong and you could end up downloading half of YouTube.  Ask me how I know...

Once you have changed 590841 to your own dog's ID number, hit the "OK" button at the bottom of the window and pat yourself on the back.  The hard part is done.

After hitting the OK button in the window above, you'll be back to the window that offered you the "Set Options" button in the first place.  You've already done that, so you can hit the "Next" button to Continue.


Breeze Past Connection Parameters

The next screen you'll see is shown below.  This is just getting fancy now.  You shouldn't have to worry about anything on this window, so hit the "Finish" button at the bottom.  And cross your fingers, because once you hit "Finish" the download will begin.


Watch the Download

Here is where it gets exciting.  The program is now going to go out and fetch your Dogster page, with all the associated diary entries, photos, and comments.  It is going to store them on your hard drive and change all the links around so that everything works on your local computer.  What it won't do is  create a copy of all the forum discussions or download all of your friends pages.  It gets your stuff for your dog.  And that is the most important thing.


How long this part takes depends on how much stuff you put on Dogster in the first place and the speed of your Internet connection.  Our connection isn't that great but there is a fair bit of stuff on Abby's page, and it still took around five fifteen minutes (the bigger set of Scan Rules from my first crack at this causes a fair bit more stuff to be downloaded).  As it runs, you'll hopefully see some familiar text going by.  The window above has some text that says "...bys_adventures", short for "Abby's Adventures".  This kind of thing told me I was on the right track.

Success!

When your pet's page has been copied, you should see a screen like this. Click "Browse Mirrored Website" and hopefully what you'll be looking at is a copy of your pet's Dogster page.


The actual page will be found where you specified it in that very first screen.  In this example, it would be in a place called "C:\My Web Sites\AbbyOnDogster".  That file will have a directory in it called "index.html".  Just click on that anytime you like and you should see a replica of your dog's pet page.  For our example, the address bar should look something like this.


See how it says "file:///C:/My Web Sites...".  That means that this file is on my local hard drive.  Contrast this with what it says when I access it over the web:

If everything went well, you'll have a copy of your dog's pet page tucked away nice and safe on your hard drive.  Back it up to a USB stick, move the directory around, or do whatever you like.  Have more than one dog on Dogster?  Just repeat the process again as many times as you like.  The ID number is the key.  To be on the safe side,it might be best to use a different project name each time.

Please note that I've put together this method and this writeup in a hurry.  There might be some cases where the process doesn't work.  If you run into trouble, leave me a message in the comments section and I'll try to help you out.  I'll also try to update this page based on people's feedback to clarify any spots where I haven't been clear.

Now I know that not everybody is going to be computer-savvy enough to do this.  But some will be.  All I ask is that those who can figure it out pay it forward and help out those who can't.  Back up their page, zip up the file, and email it to them.  They'll be incredibly grateful, and you'll feel good for helping them out.

Update - January 25th, 2014

First of all, I've been made aware of a couple limitations of this technique:
  • the link to the "Rosette, Star, and Special Gift History" doesn't work
  • clicking on those items from the main page doesn't give the pop-up message from the sender
  • the link to "See all my pup pals" doesn't work
  • the link to the video page doesn't work and the videos aren't downloaded
Now, I am no web guru but it looks like all these things have something in common: the links are not "static" but are dynamically generated when the link is clicked.  That is something that the web mirroring software used in this technique can't handle.  Other web mirroring software is similarly handicapped.

I was asked in one of the comments about videos and, while I can't get that to work as part of this process, I have found a workaround that will let you save each of your videos to your computer as separate files in case you no longer have the original version.

Basically, we are going to set up a "flash downloader".  This is generally an add-on to your web browser that lets you save the videos that you normally don't have an option to save.  The videos on Dogster are in something called "flash video" format, so you'll need a "player" for that too once the file has been downloaded.  I get into that as well.

Other methods besides the one I have tested below are bound to work and you are free to give this a shot with a different browser or technique, but I probably won't be able to help you much if you veer off this beaten path.  And this method should work for everybody on any operating system.

Want to get your videos back?  Here is how.

Step 1: Download Firefox If You Don't Already Have It

Why Firefox?  Because that is what I use, it worked for me, it is awesome, and it is free.  If you already have Firefox, you are awesome and can skip this step.  If you don't, download it from this link and become awesome.  Go ahead.  I'll wait.

Step 2: Open This Post in Firefox

If you are already using Firefox, skip this step as well.  If not, copy the address link for this post from your current browser to Firefox

Step 3: Get the Download Flash and Video Add-On

Like other browsers, Firefox's functionality can be extended with things called Add-Ons.
Install the Download Flash and Video Add-On from this link and clicking the "Add to Firefox" button that shows up in big letters on something like the snapshot below.

Firefox might give you a big scary warning like the one below.  No worries here.  There will be a number that counts down on the greyed out "Install" button on a window...

After a few seconds, the button will change to say "Install now" and it will no longer be greyed out.  Click on "Install Now".  The add-on will install and Firefox will tell you that it will be enabled when you restart Firefox.  Select "Restart Now".  Firefox should restart and bring you back to this page.

Step 4: Show Add-On Bar

Firefox Add-Ons are shown by default on an Add-On bar that is at the bottom of your browser window.  If you don't see a little box with a down arrow in the bottom right hand corner of your browser, hit the "Control" and "/" keys at the same time to make it appear, like so (I've enlarged it to make it easier to see).

Step 5: Get Your Video

So far, so good.  Next thing you want to do is open up your Dogster page and click on the link to open the page showing all of your videos using the "See my Video Book" link on the left side of your pet page.  What you are going to do is...
  • Start the video
  • Pause the video once it starts playing  (it seems to be important that you do this).
When you do this, you'll see the little icon in the bottom right change color.  Click on the icon and you should see something like the window below.  Ignore the "Flash Files to Download" on top.  Click on the video title under "Videos to Download" and the file should download to your computer!

I expect that the name of the downloaded file will look like some random collection of letters and numbers.  You'll certainly want to rename it to something that is understandable.

Step 6: Play the Video

I won't go into too much detail here.  Some computers might already have the software installed to play these videos.  Try opening / double clicking the file to see if it plays for you.  If it does, you are all set and can proceed with downloading all of your other videos.  If not, you'll want to install a piece of software to do so.  I recommend VideoLAN, as it is free, fantastic, and can play just about any kind of video file you throw at it.  It also runs on just about any computer out there.  Get it from this link.


Good luck retrieving the memories of your dog and those of your friends.  Mine are incredibly important to me.

Friday, January 3, 2014

More Than One Way to Skin a Cat

I know what you're thinking: "DeKay hasn't posted in a while.  Maybe he's dead?"  Fear not.  For while the frequency of my posting has dropped, I remain very much alive.  I've just been a little busy at work.
Thankfully the holiday season rolled around and I was able to take a couple weeks off. I took that time to relax and catch up on all the things normal people like to do: enjoy some good food, visit with friends, and hack on microcontrollers with integrated RF transceivers.
This bad boy is the Moteino from LowPowerLab. It is an Arduino clone with a 3.3V Atmega 328p that integrates a HopeRF RFM69 RF module. And let me tell you, this little module rocks. They are small, cheap, and readily available. Felix from LowPowerLab is getting tons of range out of the high power variant of these little guys.  They are easily programmed over a SPI bus so you don't need special hardware like you do with TI's CC1110, and cheap versions operating in the 900 MHz band are easy to get unlike TI's CC1101.  And recently, interoperability with the RFM12B popularized by the JeeNode has been achieved.

Now the RFM12B deserves a bit of discussion.  Like the RFM69 module, it is small, cheap, and easily programmed.  But it sucks in a number of ways.
A small FIFO means that you better have something real time or close to real time listening to the module. Otherwise its buffer overflows and you lose data. Something like an Arduino works well because it isn't doing other stuff like running an operating system. But worse than this is the hardcoded sync bytes. This pretty much limits the RFM12B to talk to other RFM12B's. And that ain't cool.

The RFM69 fixes all these problems and adds some nice features while it is at it:
  • it has a 66 byte FIFO, a fully programmable sync pattern up to eight bytes in length, and a variable length preamble
  • address checking and CRC validation is optional
  • it supports OOK, FSK, or GFSK
  • it can do AES encryption
  • other stuff
In other words, it looks like it can do what other transceiver modules can do and more.

Intrigued, I picked up a Moteino with integrated RFM69W module and a couple standalone modules while I was at it.  Then I got busy (see above).  Then I got some free time (see above).  Then I started hacking (see below).

Devoted readers of this blog will know that I am strangely compulsed to receive wireless transmissions from my Davis weather station using all kinds of strange hardware platforms.  So why stop now?  I've been looking for a platform like this that is available and easy to use so that more people can take a crack with this stuff (it isn't like you can walk into a Toys-R-Us and pick up an IM-ME anymore).  I also don't want to be glued to the Arduino for everything.  While it is great for running as a remote node, I like the idea of something like my BeagleBone Black connected directly to a transceiver module running some home monitoring and control software (HouseMon?) with Internet connectivity.

But, baby steps.  What I decided to start with was my RFM69 equipped Moteino and the LowPowerLab RFM69 Arduino library.  Because once you've got the wireless protocol figured out, hard hard can it be?  Turns out, harder than I thought.  But after slamming my head against a brick wall a time or two, I got this.
Success!
This is the data from my Davis weather station out in my yard and received on my RFM69-equipped Moteino.  The first field is the channel number, the data is the eight data bytes sent by the ISS on every transmission (see here for what those bytes mean), RSSI is the Received Signal Strength Indication, and the CRC is calculated from the first six bytes in the data packet. Every packet is sent with a CRC in the seventh and eigth bytes, so those two values will agree with the calculated CRC if the packet is good.  I've got some problem somewhere where the first packet I receive is bad, as is any packet on Channel 42.  But those are details.  I'm off to a decent start here and I'm sure I can sort those issues out in time.

Want to check it out?  My DavisRFM69 library is on GitHub and the data above was collected using the ISSRx sketch in the Examples folder.  The approach that I've taken is to subclass my driver from the LowPowerLab one, overwriting just a couple of methods that are specific to this application (namely the initialization and the interrupt handler).  That reduces duplication and lets me automatically pick up any improvements Felix incorporates into his main library.  I have made a couple minor tweaks to his main library for some register definitions that I've issued a pull request for.  Hopefully these will be incorporated into his main library soon.  In the meantime, you'll want to use my fork of the library, so everything will compile cleanly.  This and more is all in the README.

This work can be taken a lot further:
  • do a full emulation of the Davis indoor console for use by weather software like WeeWx and Cumulus
  • hang an RFM69 directly off a BeagleBone Black and write a driver to work under node.js
  • why just receive?
Pull requests gladly accepted  :-)

I'm glad to now have this stuff under my belt.  I could have taken the entire break to just sit in front of the TV eating fruitcake.  That would be easy because My Lovely Wife makes a rocking fruitcake.  But what I really find satisfying is that sense of accomplishment when you set a challenge for yourself and make it happen.  This was a good way to kick off 2014, and the year is just getting started.

And don't get me wrong: I had lots of fruitcake.

Saturday, September 14, 2013

Dog Days of Summer No More

Back when my Lovely Wife and I first married, we bought ourselves a nice starter home in the city.  It was great, with friendly neighbors, a good sized yard, and lots of trees.  I love a nice tree.

The weeping birch tree in the front yard was one of the most spectacular in town.  The almost as tall tamarack tree in the front yard was very cool, as it is one of the very few pines that turns orange and loses all of its needles in the fall.  Sadly, both trees succumbed not long after we moved out: the weeping birch from bugs and the tamarack from lightning (!).
My Weeping Birch in Fall with Tamarack at Left
The backyard was nicely treed as well: several big spruce, a small oak, a nice birch, an apple tree, and a lovely Shubert chokecherry.  The latter had been pruned to grow as a tree with several main trunks that arched over your head as you walked under it.  Lovely.

There was also something about the neighborhood that I hadn't counted on: competition.  Many of the houses there had been built thirty years ago, and many of the original owners still lived there.  That meant a lot of these folks were coming up on or already retired and had a lot of time to put into their yards.  The neighbors on our one side were semi-retired and their yard was beautiful.  The neighbors on the other side were even worse: they were both young school teachers and had all summer off to work in their yards, and that they did.  The pressure to have a nice yard in the neighborhood was constant and intense.  I had to kick things up a notch if I were to hold my head up.

So I did.  I bought a really nice cedar gazebo kit and put it up underneath the chokecherry.  It was gorgeous, with its delicate railings and cedar shake roof.  It fit the setting perfectly, and the chokecherry looked like it had grown up around the gazebo.  It was beautiful and it bought me some good cred in the neighborhood but it wasn't enough.
Beautiful, But Not Enough
So I built an enormous pond at the edge of one of the gazebo's edges, and made it as deep as city bylaws would allow.  I stocked it with goldfish and koi, and even built my own floating lights that were powered by the rest of the low voltage lights in the surrounding flower beds.  The fish were really cool, and would swim up to us looking for food whenever we walked by.
Olympic Size
The pond became a veritable black hole of my time and energy.  Things would spin rapidly out of control.  I built a ridiculously long stream from the back edge of the yard that ended with a small waterfall at the pond.  This ridiculously long stream was made even more ridiculous long by meandering it along the way.  A 1200 gallon per hour pump provided water circulation.  The sound of babbling water that crept into our open bedroom window as we went to sleep every night was hypnotically comforting.
This is Only About Half of It
The stream cut the yard in half so that drove me to build a Pete's Pond Page bridge across it.  Its minimalist design was a perfect complement to the rest of the yard.
Heavy Rocks are Heavy
And then at the head end of the stream, I built something made to look a bit like a monstrous beaver dam / waterfall.  This was really big, but it was big for a reason: it hid my single stage Pete's Pond Page biofilter built from a 100 gallon stock watering tank.  Cotton batting served as a filter media and a small bag of barley straw in there prevented algae growth as if by magic.
That Was Easy!
We enjoyed this beautiful yard for several years before moving to another city in search of bigger and better things.  We sold the house to a nurse, and we were hopeful that she would keep the yard up.  What we would learn later was that she actually bought the place for her out-of-control son.  Her son and his friends then turned the basement into a crystal meth lab.  After several years of turning the neighborhood upside down, the bank foreclosed on them.  The chemicals from the drug making process seeped into the walls, and the entire lower half of the house had to be stripped down to the 2x4's and rebuilt before the house could be put back on the market.

Something tells me the drug dealers didn't much worry about cleaning the pond filter on a regular basis.  We moved back into the area a few years later, and I could not bear to drive by the place for many years after, fearing that all the work I had put into the place would have been destroyed by a bunch of stupid dope fiends.  It broke my heart.

Fast forward to present day.  We have been on our acreage outside the city for ten years now.  Much of that time we had The World's Greatest Dog on patrol.  We are just past the one year anniversary of her passing, and our new dog Buddy is now keeping an eye on the place.  Now the thing about Buddy is that he doesn't much like the sun.  Black Siberian Husky crosses would much rather be running across the frozen tundra than soaking up the rays on a hot summer day.

The problem we have now is that we don't have much for mature trees in our yard, especially in the area where my lovely wife spends so much of her time in the summer - the garden.  No big trees, no shade where a dog can hang out to help beat the heat.  There had to be a better way.  There is.  I was taking a stroll through Costco the other day and came upon this bad boy.
Meet the Alexa Playvilion Sandbox
The gears immediately started turning.  I would build Buddy a gazebo to call his own.

Careful inspection of the display unit built up at the store showed an impressive level of quality for the thing given its $100 price tag:
  • It was made of real wood that was already pre-stained
  • There were a ton of screws holding it together.  Screw holes were pre-drilled and counter-sunk
  • There were several nice finishing touches, like small ledges near the bottom and decorative railings at the top
  • The fabric cover was nice and heavy
Construction began the next day.  Normally I don't have too much trouble with the "Put Screw A in Piece 1" type instructions, but I was was thrown off by a couple things.  There were two different types of "Piece 1" pieces for the left and right edges of each side.  And I apparently have just enough dyslexia going on that I kept getting confused as to which piece should be on which side.  Finally, I got the first few sides together and took stock of the situation.

It would not do.  I held a piece of plywood up to the roof line around 11am and saw that the shade cast by the wood fell about six feet back from where the bottom of the gazebo.  The sides were too high to cast enough useful shade over the course of the day.  The happy young children pictured on the box the gazebo came in are doomed to die from skin cancer for this reason.
Sorry Kids, But I Got Bad News For You
Modifications would be in order.  It would be a tall order for someone with the woodworking skills of Homer Simpson, but I'd be damned if I was going to do a half-assed job of this.
His Spice Rack is Also a Classic
It took plenty of cursing and more than a little swearing, but I shortened the supports by around 18".  This would give a gazebo three feet high at the roofline.  The pre-drilling and countersinking of the new screw holes that would attach the bottom boards was the second worst part of it.  The worst part was doing that twelve times for each of the support posts in the kit.  But once that was out of the way and a test fit against the end customer proved successful, things moved along quickly.

I got each of the sides built up and screwed a few of them together.  Everything seemed to be fitting together pretty well.

The six sides are together now.  The picture on the box also had six sides.  I appear to be on the right track.

Here it is with the ledges attached on the bottom pieces and the roof supports up.  They are hard to see, but there are also chunks of wood angled at 120 degrees screwed across each of the corners.  This makes the whole structure surprisingly solid.  Note that I put something on top of the concrete in the driveway to prevent the wood from getting all scratched up.

Like any good engineer would do, we had to do a final test for fit and finish.  The end customer seems to approve.  Note also how my Lovely Wife has to duck down now that I've chopped the roofline down to Buddy size.

And here is the finished product in place.  We put it up on the north side of a small Scots Pine at the corner of our garden to help cast additional shade.  Note the enclosed pool that my Lovely Wife picked up early this summer at 50% off.

So the job is done so I know what you must be asking yourself.  Does he like it?  Well...
Damn Straight, He Likes It
As I tell my friends, I like all the places I live to have a pond and gazebo.  Anything else would be uncivilized.

Monday, July 22, 2013

Gas Problems

I have been having some gas problems lately.

No, not this kind of gas, though that would actually be a lot funnier.  Maybe I need to back up a bit.

I have been playing around with the idea for a new project that would involve doing a little assembly language.  I've done x86 assembly "back in the day" when I contributed some code for Retrocade, an arcade game emulator that was the fastest thing going at the time.
Too Bad It Died
Back then I used NASM, an x86 assembler that is still very popular today.  But I've also toyed around with the idea of getting myself a Raspberry Pi and maybe doing a bit of assembly on it.  NASM is x86 only, so if I wanted to do anything on the Pi, I'd have to learn another assembler while learning another assembly language. That would kind of suck.

This brought me to think about FASM. FASM has a variant called FASMARM that can assemble ARM mnemonics. However, FASMARM doesn't actually run on ARM itself. It can only generate code on a PC that then would have to be transferred to the Pi. That would kind of suck too.

Anybody that does any assembly is aware of the GNU Assembler gas (often written as, well, "as"). gas definitely sucks. It is the only commonly used assembler that uses ATT syntax. In a nutshell, ATT syntax is:
a) backwards
b) full of superfluous % signs
This seminal article on IBM Developerworks provides all the gory details in comparing NASM to gas.  Or forget about beating around the bush and read this quote from the 646 page tome Assembly Language Step By Step:
 The GNU assembler gas uses a peculiar syntax that is utterly unlike that of all the other familiar assemblers used in the x86 world, including NASM. It has a whole set of instruction mnemonics unique to itself. I find them ugly, nonintuitive, and hard to read. This is the ATT syntax, so named because it was created by ATT as a portable assembly notation to make Unix easier to port from one underlying CPU to another. It’s ugly in part because it was designed to be generic, and it can be recast for any reasonable CPU architecture that might appear.
Suffice to say, gas is generally avoided by programmers like Amy Winehouse avoided rehab.
Should Have Gone Into Rehab

However (and there is always a however), the GNU gods saw fit to introduce a compatibility mode to gas that allowed the use of Intel style syntax, the type used by programs such as NASM and FASM. Sounds good. I decided to give it a shot.  I would do so by taking the NASM examples in the Developerworks article and see if I could get them to work in gas using Intel-style syntax.  The binutils documentation led me to believe that this should be a pretty straightforward process.  I was wrong.  There was some headbanging on the way and I nearly gave up at one point, but now I have everything working well.  This is what I learned along the way, presented as gists on gitub that you can dive into and fork as you please.

Here is Listing 1 from the Developerworks article in Intel style syntax and assembled using gas.  This luckily worked right off the bat. The key thing to note in this example is
.intel_syntax noprefix
That is the magic incantation that makes it all happen. This key tidbit from Stackoverflow is what got me going down this road in the first place.  This directive tells gas to use Intel syntax and to not need the % prefix before register names.  Put that in there and besides the directives specific to gas, the code itself looks quite a bit like NASM.

Then I got to Listing 2 and cruised through it to, mostly because it didn't introduce much in the way of new concepts.  This looked like it was going to be easy.
Next up was Listing 3. Listing 3 was a son of a bitch. This code introduced macros and some program strings and constants tucked away in the .data segment (I changed this to the read only data segment - .rodata - because this data was, well, read only).

The problem I had with Listing 3 was that I could not get the strings in .rodata to print to save my life.  Running the code in the debugger shows that I was getting the string lengths read properly.  The problem was getting the address of the strings that were then sent off to the write macro.  My read macro wasn't working right either.  I banged my head against a brick wall for an entire evening before I found this on the net the next morning.  The key text is in the code but I want to put it down again below to drive the point home.
The somewhat mysterious OFFSET FLAT: incantation tells the assembler to figure out the (4-byte) address where the variable x will end up when the program is loaded. Even the assembler does not have all the information to figure this out, since a program may be in several pieces and the assembler does not know where each piece will go. It is up to the loader to figure this out, so in fact all the assembler does with the OFFSET FLAT: reference is to make a note in the object file and it is the loader that will finally fill in the right value in the generated instruction. This is one of the respects in which object code (which ends up in a .o file after assembly) is not pure machine code.
Well, tie me to the side of a pig and roll me in the mud.  This and similar code code
mov ecx, \str
as it was in the Developerworks article would refuse to work, and no amount of BYTE PTR, brackets, dollar signs, or percent signs brought me any joy.  But this code worked just fine
mov ecx, OFFSET FLAT:\str
You'll see that what I actually ended up using here was
lea ecx, \str
just because this version is more clear (I'm trying to load the effective address of that string), I don't need "OFFSET FLAT:", and lea is generally a more powerful instruction for loading an address that I could end up using later.  I would need "OFFSET FLAT:" for a mov, push or any other instruction referencing a memory location in .data or .rodata.  Note that I don't need it to access constants for the string lengths in those .sections.  That is because the assembler can at least figure that much out on its own.  The code below works perfectly.
There are a couple things to note in Listing 3 above.  First, the gas syntax for macros is still used.  Variable substitution is made with backslashed references to the macro parameters.  Just because we are using Intel style syntax doesn't change that part of it.  No problem.  The macro syntax in gas isn't arcane like the ATT syntax itself.

The second thing to notice is how I have coded the string length.  The Developerworks example says I should use something like this
greet_str: .ascii "Hello " 
gstr_end: .set GSTR_SIZE, gstr_end - greet_str 
when in fact I have used this (thanks again, Stackoverflow).
greet_str: .ascii "Hello "
.set GSTR_SIZE, . - greet_str 
Either the Developerworks article was written before the "." was introduced to keep track of the current location or the author wasn't aware of it.  This part of the code becomes cleaner and more NASM like since the extra label "gstr_end" is not required.

On to Listing 4 and we're on a roll.  You'll see the liberal scattering of "OFFSET FLAT:" because of all the non-lea instruction references to the strings in the .data section.  There are a couple things a little different in this one though.  First (shown in the code and mentioned in the Developerworks article), the parameters passed to the linker instruction are changed to link the external C standard library.  Second is the use of "BYTE PTR" where NASM got away with just using "byte".  I tried a search and replace of "BYTE PTR" to "byte" and the program stopped working properly, though gas did not complain.  I could have experimented a bit more with this to see what was going on here but didn't bother.  My initial read of the gas docs suggested to me that "byte" should have done the trick.
Finally, we get to Listing 5.  This was smooth sailing.  Again there is liberal use of "OFFSET FLAT:" to reference memory locations in the .data section.  There is also the introduction of the .rept command to simplify the allocation of ten memory locations, but this translated over straight from the gas code in the Developerworks article without a hitch.
And that about wraps it up. Knowing a few rather arcane tricks makes gas much easier to work with.  gas is also everywhere there is a gcc compiler, so you can use it pretty much anywhere on everything.  All you need to know is a few tricks to make it more usable, and now you know those tricks.  Give it a shot.

Sunday, April 21, 2013

Dead End

It is springtime here at Mad Scientist Labs, though you would never know it.  Mother Nature has decided to totally screw us out of our spring.  Snow still covers most of our yard.  I took Buddy for a walk today wearing an old parka and nearly froze to death.

"That sucks", you must be thinking.  You would be thinking wrong.  The weather sucking outside lets me play around inside with little gadgets and gizmos.  The focus of my efforts the last couple of weeks has been trying to get my Stellaris LM4F120 (bought for the princely sum of $4.99 with free shipping) to play nicely with a little RF1100SE CC1101-based board I picked up at Deal Extreme.  The goal here, of course, is to pick up the signal from my Davis Weather Station's Outdoor Sensor Suite (ISS).  In other words, I want to get the Stellaris to tell me how cold it is outside without me having to walk the dog to find out.
Stellaris On Left, RF1100SE On Right, BMP085 Module Hanging In Mid-Air In Middle
"Should be a piece of cake", thought I.  Long ago, I had figured out the mysteries of the ISS wireless transmissions, going so far as to get my Pretty Pink Pager to work as a portable weather station.  Turns out it wasn't so simple.  It might not even be possible.

I've burned a couple of weeks on this trying to get it to work, and when it works, it barely works.  I was seeing all kinds of strange things, and I didn't know if it was my unfamiliarity with the Stellaris board or with the poorly documented RF1100SE CC1101-based module.  At times I would get a bunch of garbage.  At times I would get nothing at all.  But now I think I've come to a conclusion: if you are thinking of picking up one of these RF1100SE boards to work at anything other than 433 MHz, don't to it.  Simple as that.  And here's why.

This picture is taken from the CC1101 datasheet for using the module at 433 MHz.
Recommended CC1101 Schematic for 433 MHz Operation
And this picture is taken from the same datasheet for using the module at 915 MHz, the frequency the ISS operates at.
Recommended CC1101 Schematic for 915 MHz Operation
The two circuits are very different in the connection between the CC1101 and the antenna.  The 433 MHz recommended circuit has four inductors between the chip and the antenna, while the 915 MHz recommends either six or seven inductors between the chip and the antenna.

Now, here is a picture of my module taken from the DX website.
RF1100SE Module With Inductors Circled
Count the inductors circled in red and it becomes pretty obvious pretty fast that these RF1100SE modules are designed for 433 MHz operation.  I feared that this might be the case, and I hoped that getting a proper length antenna for 915 MHz operation might be enough.  It is not.

This is the output from my Stellaris board talking SPI to the RF1100SE with a 915 MHz antenna attached.
This Sucks
This is what I get after tweaking the register settings to within an inch of their life.  You can see all kinds of things here.
  • My frequency error (a two's complement value shown on the very right" is about as low as you can get, so I'm dialed right on the signal.
  • My RSSI value is terribly low: I'm barely seeing the signal above the background noise.
  • As tweaked up as I am, I'm still seeing a lot of bit errors.  Those packets starting with 68 and 78 are corrupted - all of the packets from this ISS should end with zero.
  • You can't see it here, but many times the radio misses the packet altogether.
In the process of banging my head against a wall, I went looking for other people using this RF1100SE module at 915 MHz and found none.  People have tried but I haven't come across anybody reporting success.  And this is why.  The CC1101 needs a very different circuit between the 433 and 868 / 915 MHz bands.  This board is designed for the one, and getting it to work at the other isn't going to happen if you expect any kind of performance out of it.

What to do, what to do?  Not quite sure yet.  Any kind of CC11xx module that doesn't already incorporate some kind of processor on it (8051, Atmega) and is cheap seems to be designed for 433 MHz.  What I'm looking for is just the RF chip itself that I can drive directly with the Stellaris board without having to fuss with two different toolchains, processors, etc.  I might have to consider a non-CC11xx type chip instead, like something HopeRF based (like this one, or maybe this new one out soon).

Anyway, this problem was just consuming me for a while.  It wasn't the "not working" part, it was the "why isn't it working" part.  I gave up several times trying to get this working, only to keep going back to it when I realized I couldn't stop thinking about the problem.  Now I know what's wrong.  I haven't been defeated.  I just realize that victory with this module doesn't look to be possible, and I'm OK with that.  You can't do what you can't do.

Mad Scientist Labs: wasting weekends so that you don't have to.

Saturday, April 6, 2013

Happy Birthday, Buddy Boy

Around April 1st, our dog Buddy turned a year old.  I say "around" because we're not exactly sure when his birthday is.  He is a rescue dog, and it turns out he is lucky to have gotten as far as he has.

I've blogged about the experience we had when we first came across the little guy.  He basically went right through somebody to come and greet us when we first visited the shelter.  "There was something about Buddy", we said back then.  One thing led to another, and we ended up bringing the little guy into our home last August.

After we got him home, we found him to be a little different than we expected.  I would say he was either On or Off.  When he was On, he was tearing around as you'd expect a puppy to tear around.  When he was Off,  he was powered down and very low energy.  We thought it was maybe because he hadn't had the best start in life.  Now that he was living with us, he was getting the food he needed to finally get growing, and all that growing would take a lot of energy.  We were wrong.

Buddy was battling bladder infections from the first weeks that we brought him home.  We were lucky to catch this and get him to the vet for treatment.  He would go onto antibiotics for a couple weeks and would seem to do OK while he was on them.  He still wasn't a dynamo, but he'd spend less time "Off" and a little more time "On".  Then the antibiotics would finish up and he'd be fine.  For a couple days.

Then he'd get sick again.  And then again.  The poor little guy went through five rounds of antibiotics for his bladder infection.  Different meds, different durations, and each time we thought that this time would do it.  He'd do OK while he was on the meds and for a couple days after they ran out, and then he'd get sick again.

His fifth round of meds wrapped up while I was off traveling on business and, as per usual, he seemed to be doing OK.  Then he got sick one night.  Really sick.  My Lovely Wife stayed up with him all night and rushed him into the vet the next day.  The news was not good.  Based on their initial look at him, they thought he might be in either liver failure or kidney failure.  My wife was girding herself for having to make a terribly difficult decision with me a few thousand miles away, and with the loss of our last dog Abby still weighing on her mind.

But we caught a break.  The blood tests came back and what they discovered was the infection in his bladder had moved on to his prostate.  They hadn't looked for this previously because prostate infections happen in six year old dogs, not six month old dogs.  Buddy was the youngest by far of any dog they had seen with this problem.  It was the astute observations of Buddy's behavior that my wife relayed on to the vet that caused them to look down this road.  The vet told her that Buddy wouldn't have made it if it were not for her.

Now prostate infections are nasty bastards.  The wall of the prostate is very thick, and it is difficult for the drugs to work their way in there.  The course of treatment the vet called up would be 12 weeks long, with medication given twice a day.  This treatment ended a month ago.  When it did, we held our breath and waited to see if the infection would come back.  My Lovely Wife watched him like a hawk.

Days passed.  Then weeks.  And now a month, with no sign of the infection reappearing.  Buddy is now "On" pretty much all the time.  He has tons of energy.  He is strong.  He tears through the house.  He runs everywhere, blasting through deep snow like a plow.
That Name Again is Mr. Plow
Buddy seems to be making up for lost time.  The infections and subsequent treatments had robbed him of his energy.  The vet was also afraid that his growth could be stunted.  But this pup is a fighter and will not be denied his youth.  He eats like ten dogs plus two and is putting on some solid size.  He now stands around 24" at the withers, and is pretty close in size to what Abby used to be.  I keep thinking he looks a lot smaller, but some pictures we have tell a different story.  Plus, big dogs tend to grow until they are 14 - 18 months, so he might have a few pounds yet to go.

An interesting side note in Buddy's time with us here was that, besides not knowing when his birthday was, we didn't know his breed either.  I mean, we had no clue as to what his breed was.  Many people saw German Shepard in him.  Some saw Rottweiler.  A few people guessed Alaskan Malmute.  I hate not knowing stuff, so we got all CSI-like and had his DNA analyzed by DNA My Dog.  For $50, you too can have a cheek swab from your dog analyzed.  What we got back was...

  • Level 2 Golden Retriever (?!?!?)
  • Level 3 Siberian Husky

Level 1 would indicated a purebred and we knew for sure he wasn't that.  The Siberian Husky made a lot of sense to me (his massive forelegs should have been a dead giveaway) but the Golden Retriever didn't seem to add up.  Then a few months went by and golden-colored bits of hair started to show up around his eyes, legs, and tail.  Looks like they were right on after all.
Not To Mention An Arse Almost As Hairy As Mine...
Buddy's lineage explains his love for the snow.  But another trait of Siberian Huskies is that they apparently like to bury things.  That explains stuff like this...
This Spells Doom For Our Garden This Year

But where we really seem to be lucking out is his temperament.  He seems to be quite a good natured little guy and will capture your heart if you give him half a chance.  He has also been incredibly well behaved as a puppy.  You hear horror stories from people with a new puppy that have their furniture torn apart.  The worst we've suffered is Buddy chewing a bit of a hole into the heel of a slipper.  He's had pretty much the run of the house whether we are home or not since he's been around eight months old, and has never made a mess in the house except when he was sick.  His crate sits downstairs unused and empty.

This is a story that certainly could have gone another way.  Could have but didn't.  We seem to have a healthy, happy, and well-behaved puppy on our hands.  That's what we had last time around with Abby too, and she turned out to be the best dog that we could have possibly hoped for.  Hopefully lightning strikes twice.