One thing that has become quickly apparent is that HTTrack can be ridiculously slow especially on bigger pages. I have found a way to speed it up. Way up. It appears that it throttles the download speed without telling you. There is a spot in the user interface that lets you set the maximum speed, but that does nothing unless you know a trick
Here is a shortcut to getting the speedup. Try putting the following in your Scan Rules
--disable-security-limitsThe first one is the secret to taking the brakes off. The second one is the maximum rate in bits per second. We have a two megabit download rate at our house, so I've set the maximum to three quarters of that, or 1.5 megabits per second. If you set this number too big, it just means it will hog your entire network connection. A rough rule of thumb might be that if you are getting internet through your phone company, try 1500000 as we have. If to the cable company, they are usually faster so try 5000000 (five million).
--max-rate 1500000
--assume php=text/html
The "assume" bit is recommended in the HTTrack manual to speed up how it parses the files if you can make certain assumptions, and this assumption seems to work great. Now it is only taking minutes to download smaller pages. The difference is night and day. These scan rules are now in the main body of the blog post.
Not in the main body of the blog post is some new filters I have been using that seems to work well for downloading from Photobucket.
+*.photobucket.com/*.jpgThe lower in the list, the higher the priority, so the order above of these filters is important. The rules start by saying you can only load .jpg, .gif, and .png files from Photobucket. That stops it from downloading all the html pages that then takes you down the rabbit hole and downloading the entire site. After that, it specifically blacklists (with the minus signs in front) the blog, secure, support, and tutorial sections of the site. This is just to be on the safe side. This has worked well for all the sites we have tried, but keep an eye on it if you decide to try it. I have not put this in the main body of the blog post but give it a shot.
+*.photobucket.com/*.gif
+*.photobucket.com/*.png
-blog.photobucket.com/*
-secure.photobucket.com/*
-support.photobucket.com/*
-tutorials.photobucket.com/*
Finally, another problem we've been having is that some pictures weren't showing up after a successful download. I suspect this is because of occasional heavy traffic clobbering the site. Try the following if you are having trouble:
- From the same window the Scan Rules are entered in, select the "Flow Control" tab
- In that tab, enter 5 into the Retries field.
- Everything else is as per usual.
Update February 9th: Disable Photobucket Scan Rules
It sounds like some people are running issues where HTTrack wants to download half of Photobucket. It looks like you will need to figure out more specific scan rules than the ones I have in there now. I have removed references to Photobucket from the post.
Update February 8th: Fixes and the Addition of Catster!
I have updated the scan rules to fix a few things and have created a set of scan rules for Catster as well. The new rules are in the main body of the post. A shout-out to the Dogster (and Catster!) folks that have helped out so much.
- The gift archive now works. A new scan filter "+www.dogster.com/subscr/gift_archive.php?pet_id=590841" (or whatever your pet's number is) does the trick.
- Thumbnails in photo comments now work. Dogster, for some bizarre reason, has those thumbnails in a URL that looks like "+files.dogster.com./blahblahblah". Did you catch the weird period between "com" and "/" in that last sentence? Neither did I at first. Tweaking the Scan Rule from "+files.dogster.com/*" to "+files.dogster.com*" did the trick.
- Added a scan rule"+badge.dogster.com/*" to fix missing badges.
- Added a few new scan rules that should help images from flickr,
photobucket, and one other site I'd never heard of come through: "+*mytextgraphics.com""+*.photobucket.com/*", "+farm*.staticflickr.com/*", and "+farm*.static.flickr.com/*". You can skip these if you don't have images off the main site, but leaving them in doesn't hurt anything. - Added a set of scan rules for Catster. Did you know that the images on Catster are stored on servers named Dogster? Neither did I at first. For this reason, the Catster list will have a "+files.dogster.com*" entry in it on purpose. It will also have a "+files.catster.com*" on it that I doubt is needed, but better safe than sorry.
- Added a scan rule that pulls in a specific file used to format the display of the photo pages "+www.dogster.com/photos/photo.css", though I didn't really see a difference when it was added.
- Reordered the list of scan rules to be a little more sane
It doesn't hurt to test the archive out by disconnecting your Internet connection, clearing your browsers cache (Google is your friend here), and then bringing up the web page created by HTTrack for your pet to see if anything is unexpectedly missing. Note that the page might be slow to load this way because it is trying to reach out to some sites like Facebook, Google, and Twitter that I have intentionally not mirrored. Your browser will wait for a bit, give up, and then load the archive anyway. These links don't affect the display of your stuff and they'll be there long after Dogster Doomsday. Once you connect the Internet back up, it will reach these sites normally anyway
If you are an old hand at this archive process, the only substantial changes to this post are in the "Specify The Options" part. The rest is the same, so you can save yourself some reading.
Finally, some of you might be wondering why this archive takes so damn long sometimes. I was mystified by this for a while too until I ran a test on a cat that had 36 pages (!) of diary entries. I checked out the folder where the diaries are stored and there were a ton more entries than that.
WHY?
Well, there might be 36 pages of diary entries, but there are also five or six diary entries per page. If you click on a "Comments" link, a whole new page opens up for just that diary entry. Same thing for photos. So if you have ten pages of diary entries and ten pages of photos, you don't end up downloading twenty pages. You download twenty pages where entries are grouped together PLUS over a hundred pages dedicated to each individual diary entry and photo. Yeah, that is a lot, but that is the only way to see the comments. It also doesn't help that the download speeds from Dogster and Catster seems to be less than speedy in the first place.
"Beepers" on the Dogster forum posted a suggestion on how to speed up an update if you already have an existing download.
- On the first option page, you can choose "Existing project name". Click the arrow to choose the one you want to update.
- On the next page/screen, in the "Action" block, click the arrow again and choose *Update existing download.
- Then click on "Set options" and the "Scan Rules" tab as usual. All your rules for the previous save will be there. Just add the new rules at the bottom and proceed as usual.
Update February 5th:
The Bad News
Folks on the Dogster forums groups discovered that the archives would not work when they had no Internet connection. That implied that the download would stop working once Dogster shut down. I verified that this is a problem and am very sorry to say that all the downloads that everyone has done to this point will be useless once Dogster shuts down. The web browser was doing some stuff behind the scenes that I wasn't aware of.
The Good News
I have a fix that I would like people to try. I have tested this on a couple of pages now with my browser cache cleared and our internet disconnected and it seems to work perfectly. It still has the same limitations as before (can't click on gifts to get details, etc) but all the important stuff will be there. You will still be able to navigate around the page just like you did before.
The Fix
A new set of Scan Rules is now in the main body of the post. The rest of the steps should be the same. Try these new scan rules out and post feedback in the comments. If you are computer savvy, you can double check by clearing your browser cache, disconnecting your Internet connection, and loading the archived page. If everything looks good, you are ready for Doomsday when Dogster shuts down.
Please test this out and give feedback in the comments. Once again, I'm sorry for my error. If I knew what I was doing here, it would help!
P.S.
Some people have been worried about seeing stuff like this in their browser address bar.
file:///C:/My%20Web%20Sites/cocopuffondogster/www.dogster.com/dogs/500107.html
The worry is that www.dogster.com is showing up there still. That isn't actually a problem as long as the start of the address starts with "file:///C:/blahblahblah". In this case the "www.dogster.com" part in the middle is actually now a directory on your hard drive. You can use Windows Explorer or whatever to actually navigate to that directory and below. There is all kinds of neat stuff tucked away in there!
Update Jan 25th:
See near the bottom of the page for instructions on how to save your videos! A couple limitations of this technique are also discussed. And after all of this, look who was made Dog of The Day for January 25th, 2014!!!

One of the saddest times of my life was when our dear dog Abby passed. She was my best friend and a big part of our lives. That was about a year and a half ago now and it still brings a lump to my throat just thinking about that awful time.

In the days that followed, I was struck by the sympathy and compassion expressed by My Lovely Wife’s friends in the Dogster community. Dogster is a website that dog lovers from all over the world congregate to share photos, stories, and advice on their best friends. While I don't doubt that some of these folks might be a few Milk Bones short of a full bag, My Lovely Wife has developed a true friendship with many people on that site, none of whom she has ever met in person. Our dog now gets more Christmas cards than we do.
Unfortunately, word went out a short time ago that Dogster will be closing down. All of the pet pages with the photos, diaries, and associated comments will disappear. People are understandably upset because they don't know how to save all of those memories. Some are printing the pages off, some are resorting to screenshots. And some are just at a loss.
But I think I know a better way. And I'll show you how to do it yourself. Step by step. When you are done, you'll have all of your stuff for your dog. It won't copy forum discussions and stuff like that. But it will copy all of your diary entries, all of your photos, and all of the comments on that stuff. And it will store all that away on your local hard drive.
Ready to go? Good. Start with...
Read This Whole Thing Through
Like a recipe, I highly recommend reading this through once or twice to get some idea of what you'll be doing. It does assume you know your way around your computer a little bit, but you don't need to be a guru or anything like that. If you are comfortable installing a program on your computer and navigating around the various files on your PC, you should be just fine.
Download HTTRack
HTTrack bills itself as a website copier. Click on this link, download the appropriate file for your PC, and install it on your computer. There are a bunch of different versions for the various flavors Windows and whether you are running the 32-bit or 64-bit version, so choose wisely. You'll be out of luck if you are on a Mac (sorry) unless you know how to compile your own programs. There looks to be versions for various Linux distributions though for the 0.001% of Dogster users on that operating system.
During the installation process, the program will ask you if you want to put an icon on the Desktop and in the Start Menu. Let it do so.
Start WinHTTrack
Click the icon the installer put on your Desktop. The program should start up, displaying one of the ugliest user interfaces in existence. That's OK. We aren't using it for its looks. When you get the screen below, hit the "Next >" button to continue.

Start a New Project
We start out by defining a new project as follows:
- New project name: This is what the program will name the directory where it stores the files you will download. I'll be using Abby's Dogster page as an example, so I called my project "AbbyOnDogster". Use whatever name you like here.
- Project category: Just leave this blank
- Base path: If you were going to download multiple Dogster pages, then all of them would go into this directory. You can use the default "C:\My Web Sites" (it works fine) or specify any other folder you like.
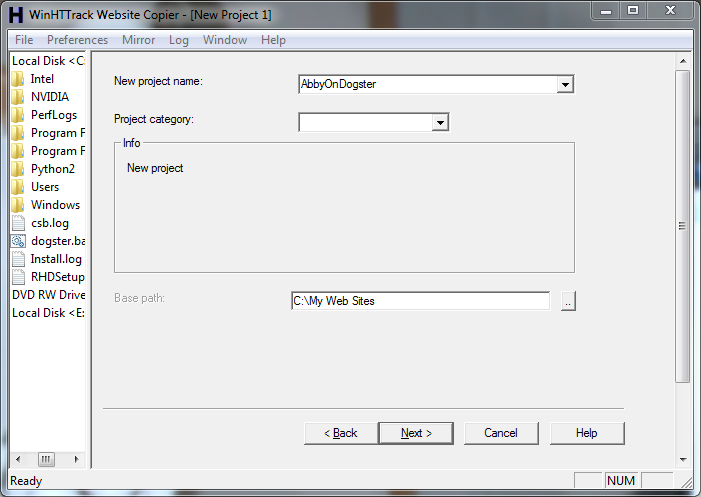
Once you're entered that information, hit the "Next >" button to continue.
Specify the Site To Mirror
So far so good, but now it starts getting a little trickier. Fill out the next window as follows.
- Action: Stick with the default of "Download web site(s)"
- Web Addresses: (URL): The best way to fill this in is to navigate to the Dogster page you want to clone, select the address area, copy it (Control-C), and paste it (Control-V). Or just type it in from scratch. The window below shows the address for Abby's page. It will look something like http://www.dogster.com/dogs/590841. Click that link to see what I mean.
- The tricky part is coming up. Do not hit the "Next >" button yet. Instead, select the "Set options..." button above it.

Specify the Options
(This Section updated February 5th and then on February 8th to fix the Scan Rules as mentioned at the top of this post).
When you hit the "Set options...." button, there will be a bunch of tabs on top. Click on the tab that says "Scan Rules". Don't worry about any of the other tabs. See the area I have circled in blue? Click your mouse in that area and delete every single character in there. You want it to be perfectly empty. Do not hit the "Exclude link(s)..." button. Do not hit the "Include link(s)..." button.

Now, copy the
-*Note that there is now a * after "+files.dogster.com". This is a change from my first and second cracks at this. Don't miss that one.
+www.dogster.com/dogs/590841
+www.dogster.com/dogs/590841/*
+www.dogster.com/subscr/gift_archive.php?pet_id=590841
+www.dogster.com/static/*
+www.dogster.com/files*
+www.dogster.com/images/*
+badge.dogster.com/*
+files.dogster.com*
+www.dogster.com/photos/photo.css
+*.cdnsters.com/*
+tetra.saymedia.com/*
+*amazonaws.com/*
+use.typekit.com/*
+*mytextgraphics.com*
+farm*.staticflickr.com/*
+farm*.static.flickr.com/*
--disable-security-limits
--max-rate 1500000
--assume php=text/html
What if you have a cat? Other than having to vacuum hairballs off the carpet on a regular basis, you want to use this set of scan rules instead. Abby was not a cat, but work with me here. Again, cut and paste is your friend.
-*As explained up top, there are lines for both "+files.catster.com*" and "+files.dogster.com*" because Catster's images are actually stored on Dogster's servers.
+www.catster.com/cats/590841
+www.catster.com/cats/590841/*
+www.catster.com/subscr/gift_archive.php?pet_id=590841
+www.catster.com/static/*
+www.catster.com/files*
+www.dogster.com/files*
+www.catster.com/images/*
+badge.catster.com/*
+files.catster.com*
+files.dogster.com*
+www.catster.com/photos/photo.css
+*.cdnsters.com/*
+tetra.saymedia.com/*
+*amazonaws.com/*
+use.typekit.com/*
+*mytextgraphics.com*
+farm*.staticflickr.com/*
+farm*.static.flickr.com/*
--disable-security-limits
--max-rate 1500000
--assume php=text/html
This might look like Greek to you, but every single character here is important. Make sure that these
Or almost all of it. The "+*mytextgraphics.com/*" won't be necessary for most people and could be safely left out. One of our friends had a link to this website for an animated image of her pets name so this had to be included to get that to show up. Others had images from Flickr (+farm*.staticflickr.com/*)
You should end up with something that looks exactly like this when you are done. Unfortunately the Scan Rules list is kind of long now so stuff is getting cut off on the bottom of the list. But you get my drift.

Now if we were to proceed on from this point, it would copy Abby's page on Dogster because her Dogster ID number is 590841. What you need to do now is replace the number 590841 with your own dog's ID number in all three places: the second, third, and fourth lines of the list. Your dog's ID number is the one that shows up in the address bar of your web browser whenever you go to your dog's pet page. It is usually six or seven digits long. Do not add or subtract asterisks, slashes, or plus signs, or anything else unless you really know what you are doing. Just change the number. Get this wrong and you could end up downloading half of YouTube. Ask me how I know...
Once you have changed 590841 to your own dog's ID number, hit the "OK" button at the bottom of the window and pat yourself on the back. The hard part is done.
After hitting the OK button in the window above, you'll be back to the window that offered you the "Set Options" button in the first place. You've already done that, so you can hit the "Next" button to Continue.
Breeze Past Connection Parameters
The next screen you'll see is shown below. This is just getting fancy now. You shouldn't have to worry about anything on this window, so hit the "Finish" button at the bottom. And cross your fingers, because once you hit "Finish" the download will begin.

Watch the Download
Here is where it gets exciting. The program is now going to go out and fetch your Dogster page, with all the associated diary entries, photos, and comments. It is going to store them on your hard drive and change all the links around so that everything works on your local computer. What it won't do is create a copy of all the forum discussions or download all of your friends pages. It gets your stuff for your dog. And that is the most important thing.

How long this part takes depends on how much stuff you put on Dogster in the first place and the speed of your Internet connection. Our connection isn't that great but there is a fair bit of stuff on Abby's page, and it still took around
Success!
When your pet's page has been copied, you should see a screen like this. Click "Browse Mirrored Website" and hopefully what you'll be looking at is a copy of your pet's Dogster page.

The actual page will be found where you specified it in that very first screen. In this example, it would be in a place called "C:\My Web Sites\AbbyOnDogster". That file will have a directory in it called "index.html". Just click on that anytime you like and you should see a replica of your dog's pet page. For our example, the address bar should look something like this.

See how it says "file:///C:/My Web Sites...". That means that this file is on my local hard drive. Contrast this with what it says when I access it over the web:

If everything went well, you'll have a copy of your dog's pet page tucked away nice and safe on your hard drive. Back it up to a USB stick, move the directory around, or do whatever you like. Have more than one dog on Dogster? Just repeat the process again as many times as you like. The ID number is the key. To be on the safe side,it might be best to use a different project name each time.
Please note that I've put together this method and this writeup in a hurry. There might be some cases where the process doesn't work. If you run into trouble, leave me a message in the comments section and I'll try to help you out. I'll also try to update this page based on people's feedback to clarify any spots where I haven't been clear.
Now I know that not everybody is going to be computer-savvy enough to do this. But some will be. All I ask is that those who can figure it out pay it forward and help out those who can't. Back up their page, zip up the file, and email it to them. They'll be incredibly grateful, and you'll feel good for helping them out.
Update - January 25th, 2014
First of all, I've been made aware of a couple limitations of this technique:
- the link to the "Rosette, Star, and Special Gift History" doesn't work
- clicking on those items from the main page doesn't give the pop-up message from the sender
- the link to "See all my pup pals" doesn't work
- the link to the video page doesn't work and the videos aren't downloaded
I was asked in one of the comments about videos and, while I can't get that to work as part of this process, I have found a workaround that will let you save each of your videos to your computer as separate files in case you no longer have the original version.
Basically, we are going to set up a "flash downloader". This is generally an add-on to your web browser that lets you save the videos that you normally don't have an option to save. The videos on Dogster are in something called "flash video" format, so you'll need a "player" for that too once the file has been downloaded. I get into that as well.
Other methods besides the one I have tested below are bound to work and you are free to give this a shot with a different browser or technique, but I probably won't be able to help you much if you veer off this beaten path. And this method should work for everybody on any operating system.
Want to get your videos back? Here is how.
Step 1: Download Firefox If You Don't Already Have It
Why Firefox? Because that is what I use, it worked for me, it is awesome, and it is free. If you already have Firefox, you are awesome and can skip this step. If you don't, download it from this link and become awesome. Go ahead. I'll wait.
Step 2: Open This Post in Firefox
If you are already using Firefox, skip this step as well. If not, copy the address link for this post from your current browser to Firefox
Step 3: Get the Download Flash and Video Add-On
Like other browsers, Firefox's functionality can be extended with things called Add-Ons.
Install the Download Flash and Video Add-On from this link and clicking the "Add to Firefox" button that shows up in big letters on something like the snapshot below.

Firefox might give you a big scary warning like the one below. No worries here. There will be a number that counts down on the greyed out "Install" button on a window...

After a few seconds, the button will change to say "Install now" and it will no longer be greyed out. Click on "Install Now". The add-on will install and Firefox will tell you that it will be enabled when you restart Firefox. Select "Restart Now". Firefox should restart and bring you back to this page.
Step 4: Show Add-On Bar
Firefox Add-Ons are shown by default on an Add-On bar that is at the bottom of your browser window. If you don't see a little box with a down arrow in the bottom right hand corner of your browser, hit the "Control" and "/" keys at the same time to make it appear, like so (I've enlarged it to make it easier to see).

Step 5: Get Your Video
So far, so good. Next thing you want to do is open up your Dogster page and click on the link to open the page showing all of your videos using the "See my Video Book" link on the left side of your pet page. What you are going to do is...
- Start the video
- Pause the video once it starts playing (it seems to be important that you do this).

I expect that the name of the downloaded file will look like some random collection of letters and numbers. You'll certainly want to rename it to something that is understandable.
Step 6: Play the Video
I won't go into too much detail here. Some computers might already have the software installed to play these videos. Try opening / double clicking the file to see if it plays for you. If it does, you are all set and can proceed with downloading all of your other videos. If not, you'll want to install a piece of software to do so. I recommend VideoLAN, as it is free, fantastic, and can play just about any kind of video file you throw at it. It also runs on just about any computer out there. Get it from this link.
Good luck retrieving the memories of your dog and those of your friends. Mine are incredibly important to me.


