I got my GoodFET circuit board in the mail on Friday. This was perfect timing: I had all the rest of the parts in-house and my weekend was free. Time to dig in.
The pin pitch of the processor and USB to serial chip are 0.5mm (i.e. very fine). Also, the resistors, capacitors, and LEDs are in an 0603 packages. That mean .06" x .03" in size. Small stuff. I remember years ago when electronics started moving to surface mount technology, and how I thought that would spell the end of the people trying to do this stuff at home. How wrong I was. Surface mount actually simplifies things in a lot of ways.
Having a pre-fabbed PCB helps a lot, of course. But you've still got to get the parts soldered on to it. A lot of people who do this use a technique where parts are placed on the board with solder paste, and then a skillet or a toaster oven is used to "reflow" the solder and make the connection permanent. I don't have one of those yet, though it is on my list of things to do. So what to do?
There is a great tutorial on constructing the board by hand at the GoodFET site. I thought about this technique, but changed it up a bit and went with that described by CuriousInventor instead. The drag solder method he described sounded easy to do. So how did I do my first time ever with this technique?
 |
| First Time for Everything |
Once that was done, I hooked up the IM-ME to the GoodFET. I tripped across a couple things before things started working smoothly for me.
- I was doing this in Arch Linux, and "python" in Arch is actually Python 3. The two aren't 100% compatible, so I was getting syntax errors. This meant editing any of the goodfet Python scripts I was going to run, changing the first line from '#!/usr/bin/env python' to '#!/usr/bin/env python2'
- Any script I was going to run needed a little 'chmod +x
' done to them first.
 |
| Awesomeness |
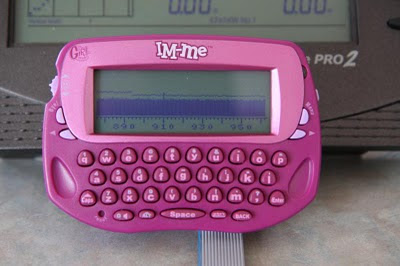
Second thing to notice is the actual spectrum analzyer display. See the slight rise in signal level on the left? That is, I believe, the transmissions from the Davis Integrated Sensor Suite! The picture shows a flat line now, but that is because the IM-ME is in max hold mode. When first fired up, you see little blips coming up in scattered spots across the left side of the display. These, I believe, are individual transmissions. Leave the thing run for long enough, and you get a flat line as all the transmissions join together.
The one thing that is bugging me is that if this is indeed the Davis ISS transmissions, then the frequency shown on the analyzer is incorrect. The Davis ISS (if I understand things correctly) transmits between 902.5 and 927.5 MHz. I'm going to take the IM-ME to work tomorrow, generate a carrier at a known frequency, and see if it shows up accurately. That, and impress the hell out of my friends.
It was really great to get this going. In a few minutes with the GoodFET, I was further ahead than a couple weekends spent trying to get the Bus Pirate to program the IM-ME. But besides that, I now have a development platform that I can start trying my own stuff out on. I plan to start with the spectrum analyzer code and do my own little "Hello World" kind of thing on it. Then I can work toward something that starts picking up the transmissions from the ISS. To do this, I am going to need a better look at how the Davis console configures the radio chip's registers, and that is going to need the Open Logic Sniffer that just shipped from Hong Kong yesterday.
To wrap this up, I wanted to mention just how one Deity or another is trying to slow me down. I need to be able to run SmartRF Studio to help me sort out the register configurations on the Davis console and figure out the equivalents on the IM-ME. I already knew that the latest version, SmartRF Studio 7, didn't include support for older chips like the CC1021 in the console. At Travis' suggestion, I went to try out SmartRF Studio 6 which does have support for this chip. Unluckily for me, this crashes almost immediately in the 64 bit Windows I have on my laptop. Sigh. TI does make the code available for Studio 6, and I could try recompiling it, but I think I'll just set up a VM with XP and run it that way. Seems a simpler way to go, and I won't have to switch back and forth between Linux and Windows all the time
Things are starting to get interesting...
Very cool!
ReplyDeleteThanks. But my suspicions appear to be correct. The frequency display looks 35 MHz low.
ReplyDelete